UN CONILLET ENS VISITA ALS #DOMINGOSILUSTRADOS.

De tant en tant, Les Antònies deixem sortir la nostra part més tendre i fem dibuixos que els bebès estimaran. Aquest conillet que us presentem avui, és tot dolçor.
La il·lustració l’hem treballat amb aquarel·les i llapis de color. Els repunts i detalls els hem fet amb retolador negre en diferents gruixos; la llum l’hem feta amb retolador blanc.
Un diumenge més us esperem a FB amb les vostres il·lustracions, doodles, dibuixos, mixed media, collages i pintures amb l’etiqueta #domingosilustrados. Ja tenim ganes de gaudir de la vostra creativitat.


ROSA I LILA PER ANAR A BUSCAR PASTANAGUES!!!


UN CONEJITO NOS VISITA EN LOS #DOMINGOSILUSTRADOS.

De vez en cuando, Les Antònies dejamos salir nuestra parte más tierna y hacemos dibujos que los bebés amarán. Este conejito que os presentamos hoy, es todo dulzura.
La ilustración la hemos trabajado con acuarelas y lápices de color. Los pespuntes y detalles los hemos hecho con rotulador negro en diferentes gruesos; la luz la hemos hecho con rotulador blanco.
Un domingo más os esperamos en FB con vuestras ilustraciones, doodles, dibujos, mixed media, collages y pinturas con la etiqueta #domingosilustrados. Ya tenemos ganas de disfrutar de vuestra creatividad.

¡¡¡ROSA Y LILA PARA IR A BUSCAR ZANAHORIAS!!!


A BUNNY VISITS US TO THE #DOMINGOSILUSTRADOS.

From time to time, Les Antònies leave out our most tender side and make drawings that the babies will love. This Bunny that we are presenting today, it's all sweetness.
The illustration we have worked with watercolours and colour pencils. The backstitches and details we've done with black marker in different thicknesses; the light we made with white marker.
One more sunday we expect you on FB with your illustrations, doodles, drawings, mixed media, collages and paintings with the tag #domingosilustrados. We already have the desire to enjoy your creativity.


PINK AND LILAC TO PICK CARROTS!!!

MINI ÀLBUM “FOLLOW YOUR DREAMS”: TUTORIAL D’SCRAPBOOK.

En aquesta ocasió Les Antònies us explicarem com hem fet aquest mini àlbum perfecte per començar en el món de l’scrapbook, però no ens cal cap esquema, perquè és molt simple. El gran secret està en el vostre gust per la decoració.
El material que hem utilitzat és molt variat. Per les pàgines hem fet servir 2 papers decorats d’scrapbook: “Misia:sert” de la Sra. Granger i “Documentary” d’American Crafts, comprats a ScrapHouse; cartolina de color llis, per les tapes; els nostres propis papers decorats i enganxines, decoracions, siluetes etc., comprats a diverses botigues on tinguin articles d’scrapbook, fins i tot les dels “xinos” .
Comencem el tutorial. Hem tallat els papers d’scrapbook, per fer les pàgines, en quatre parts iguals; ja sabeu que aquests papers venen en polzades (12X12in) és a dir 30’5x30,5cm, per això, si teniu taula de tallar de dues cares, us recomano que feu servir les polzades, si no  feu quatre quadrats iguals, ajustant les mides. Per fer les tapes tallem la cartolina una mica més gran que les pàgines, més o menys 7X7in o 16’25X16’25cm; nosaltres hem fet una butxaqueta a la tapa davantera, per això l’hem deixada més llarga, de la mesura que volíem que fos la butxaca.
Abans de començar a decorar hem fet els forats per poder passar el cordill per enquadernar. Hem marcat el centre de les tapes i de les pàgines i els hem fet amb una perforadora doble, full a full. Ja tenim la base 
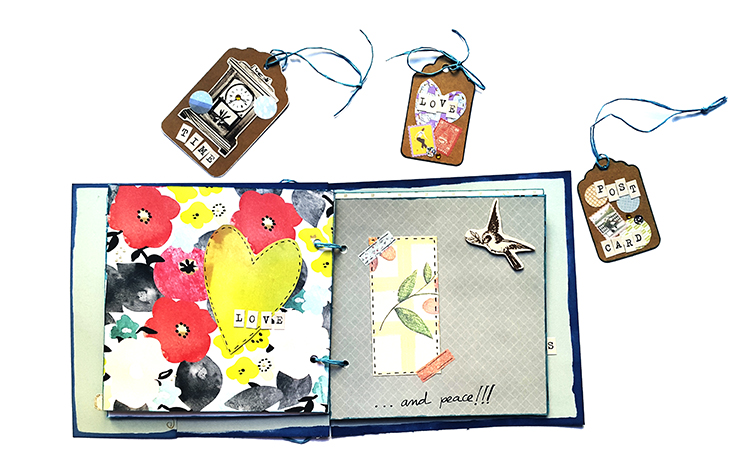
preparada per deixar anar la nostra creativitat. Decoreu com vulgueu i, si voleu, podeu substituir el cordill per anelles, cinta, o botons. També podeu afegir targetes, etiquetes i tots els complements que us agradin.
Ja veieu que no cal complicar-se gaire per fer un mini àlbum bonic. Esperem que aquesta idea us doni inspiració. És allò que més ens agrada.


SEGUEIX ELS TEUS SOMNIS I RECULL ELS TEUS RECORDS!!!


MINI ÁLBUM “FOLLOW YOUR DREAMS”: TUTORIAL DE SCRAPBOOK.

En esta ocasión Les Antònies os explicaremos cómo hemos hecho este mini álbum perfecto para empezar en el mundo del scrapbook, pero no nos hace falta ningún esquema, porque es muy simple. El gran secreto está en vuestro gusto para la decoración. 
El material que hemos utilizado es muy variado. Para las páginas hemos usado 2 papeles decorados de scrapbook: “Misia: sert” de la Sra. Granger y “Documentary” de American Crafts, comprados en ScrapHouse; cartulina de color liso, para las tapas; nuestros propios papeles decorados y pegatinas, decoraciones, siluetas etc., comprados en varias tiendas donde tienen artículos de scrapbook, incluso las de los “chinos”.
Empezamos el tutorial. Hemos cortado los papeles de scrapbook, para hacer las páginas, en cuatro partes iguales; ya sabéis que estos papeles vienen en pulgadas (12X12in) es decir 30’5x30’5cm, por eso, si tenéis tabla de cortar de dos caras, os recomiendo que uséis las pulgadas, sino hacéis cuatro cuadrados iguales, ajustando las medidas. Para hacer las tapas cortamos la cartulina algo más grande que las páginas, más o menos 7X7in o 16’25X16’25cm; nosotras hemos hecho un bolsillito en la tapa delantera, por eso la hemos dejado más larga, de la medida que queríamos que fuera el bolsillo. 
Antes de empezar a decorar hemos hecho los agujeros para poder pasar el cordel para encuadernar. Hemos marcado el centro de las tapas y de las páginas y los hemos hecho con una perforadora doble, hoja a hoja. Ya tenemos la base preparada para dejar ir nuestra creatividad. Decorad como os guste y, si queréis, podéis sustituir el cordel por anillas, cinta, o botones. También podéis añadir tarjetas, etiquetas y todos los complementos que os gusten.
Ya veis que no hay que complicarse mucho para hacer un mini álbum bonito. Esperamos que esta idea os inspire. Es lo que más nos gusta.


¡¡¡SIGUE TUS SUEÑOS Y RECOGE TUS RECUERDOS!!!


MINI ALBUM “FOLLOW YOUR DREAMS": SCRAPBOOK TUTORIAL.

On this occasion, Les Antònies will explain how we made this mini album perfect to get you started in the world of the scrapbook, but we do not need any scheme, because it is very simple. The big secret is in your taste for decoration.
The material we used is very varied. Through the pages we used 2 sets of decorated paper of scrapbook: "Misia sert:" of Sra. Granger and "Documentary" of American Crafts, bought at ScrapHouse. Sleek colour cardboard, for the covers; our own decorated papers and stickers, decorations, silhouettes etc., purchased from several stores where have Scrapbook articles, even those of the "chinos”.
We begin the tutorial. We cut scrapbook papers, to make the pages, in four equal parts; you know that these papers are in inches (12X12in) is 30'5x30'5 cm, therefore if you have double-sided cutting board, we recommend that you use inches, if you do not, square equals four, adjusting measures. To make tops cut the cardboard slightly larger than the pages, more or less 7X7in or 16'25X16'25 cm; we’ve done a pouch on the front cover, so have left it longer, the measure that we wanted it to be the pocket.
Before we start to decorate we made the holes to pass the string bindings. We have marked the centre of the covers and the pages and we have done it with a double punch, sheet to sheet. We already have the base ready to let go of our creativity. Garnish as you like and, if you want, you can replace the cord for rings, tape, or buttons. You can also add cards, tags and all the accessories that you like.
As you can see you don't need to complicate too much to make a beautiful mini album. We hope that this idea will give you inspiration. Is what we like.


FOLLOW YOUR DREAMS AND COLLECT YOUR MEMORIES!!!

ROSES DOODLE ALS #DOMINGOSILUSTRADOS.

Com ja us vàrem dir anteriorment, per Les Antònies el 2016 serà un any doodle. El dibuix d’aquesta setmana és un reflex d’això mateix.
Damunt d’un paper tintat amb aquarel·la líquida hem dibuixat amb lleixiu unes roses i unes fulles. Una vegada tot està eixut (millor esperar un dia abans de continuar amb la següent passa) amb retolador negre hem dibuixat els ornaments doodle a les roses i les fulles i, amb retolador blanc, hem donat uns tocs de llum. Per acabar el dibuix, hem continuant donant color només a les flors i les fulles amb aquarel·la líquida.
Ens encanta veure els vostres doodles, dibuixos, il·lustracions, mixed media, collages, pintures i dissenys quan els compartiu amb tothom al grup de FB amb l’etiqueta #domingosilustrados.


COMBINACIÓ DE TÈCNIQUES!!!


ROSAS DOODLE EN LOS #DOMINGOSILUSTRADOS.

Como ya os dijimos anteriormente, para Les Antònies el 2016 será un año doodle. El dibujo de esta semana es un reflejo de esto.
Sobre un papel tintado con acuarela líquida hemos dibujado con lejía unas rosas y unas hojas. Una vez todo está seco (mejor esperar un día antes de continuar con el siguiente paso) con rotulador negro hemos dibujado los ornamentos doodle en las rosas y las hojas y, con rotulador blanco, hemos dado unos toques de luz. Para acabar el dibujo, hemos continuado dando color solo en las flores y las hojas con acuarela líquida.
Nos encanta ver vuestros doodles, dibujos, ilustraciones, mixed media, collages, pinturas y diseños cuando los compartís con todo el grupo de FB con la etiqueta #domingosilustrados.


¡¡¡COMBINACIÓN DE TÉCNICAS!!!


DOODLE ROSES TO THE #DOMINGOSILUSTRADOS.

As we said previously, to Les Antònies in 2016 will be the doodle year. The drawing of this week is a reflection of itself.
On a paper dyeing with liquid watercolour we have drawn with bleach a few roses and leaves. Once everything is dry (better to wait one day before continuing with the next step) with black marker we have drawn ornaments doodle on roses and leaves and with white marker, we have given some light touches. To finish the drawing, we have continuing giving colour only in the flowers and leaves with liquid watercolour.
We love to see your doodles, drawings, illustrations, mixed media, collages, paintings and designs when you share with everyone in the FB group with the tag #domingosilustrados.


COMBINATION OF TECHNIQUES!!!


COLORADO STAR: TUTORIAL DE PATCHWORK.

En aquest post, Les Antònies tornem amb els estels. Hem après a fer aquest bloc tan fàcil amb el tutorial de la Missouri Star Quilt Company penjat a YouTube. Com sempre, nosaltres us deixem l’enllaç del vídeo i afegim el tutorial dibuixat.
Comencem. Necessitem 2 quadrats de color llis o blanc de 20cmX20cm i 2 quadrats amb estampats diferents de 20cmX20cm, també (1). Emparellem un quadrat estampat i un quadrat llis i els encarem (2). Darrera el quadrat llis, dibuixem dues ratlles en diagonal, formant una creu en aspa (3); cosim a cada banda de les ratlles una costura, deixant 0’5cm de marge (4); una vegada cosit tallem per la meitat en horitzontal i vertical (5) i després tallem per la línia dibuixada (6). Ens queden 8 triangles (7); ho repetim amb l’altra parella i al final tenim 8 quadrats amb triangle d’un color i 8 de l’altre (8). Ja podem muntar el bloc.
Col·loquem les peces com veieu al dibuix (9); fem com sempre: tira a tira, cosim el primer quadrat amb el segon, el tercer al segon i acabem cosint el quart al tercer, fins a tenir les quatre tires (10).  Abans d’unir les tires us explicarem un truc de planxa, que fa més fàcil el muntatge del bloc: amb les tires cosides, per darrere, planxem les costures dels quadrats totes en la mateixa direcció; la tira que anirà sota de l’anterior s’ha de planxar de manera que les costures vagin en direcció contraria a les de la tira de dalt. Això ens permetrà encaixar bé les costures per cosir-les.
Continuem amb el bloc. Una vegada hem planxat com us hem explicat a dalt, unim les tires; la primera amb la segona, la tercera amb la segona i la quarta amb la tercera (11). I el bloc està acabat (12).
Com sempre, us deixem el full amb les mesures i quantitats; també l’esquema del bloc (13) i com quedarien 4 blocs units (14).
Esperem que aquest Estel de Colorado us hagi agradat tant com a nosaltres i us animeu a fer-lo. És molt fàcil.


D’ESTEL EN ESTEL, UNA CONSTELACIÓ!!!


COLORADO STAR: TUTORIAL DE PATCHWORK.

En este post, Les Antònies volvemos con las estrellas. Hemos aprendido a hacer este bloque tan fácil con el tutorial de la Misuri Star Quilt Company colgado en YouTube. Como siempre, nosotras os dejamos el enlace del vídeo y añadimos el tutorial dibujado.
Empezamos. Necesitamos 2 cuadrados de color liso o blanco de 20cmX20cm y 2 cuadrados con estampados diferentes de 20cmX20cm, también (1). Emparejamos un cuadrado estampado y un cuadrado liso y los encaramos (2). Detrás el cuadrado liso, dibujamos dos líneas en diagonal, formando una cruz en aspa (3); cosemos a cada lado de las rayas una costura, dejando 0’5cm de margen (4); una vez cosido cortamos por la mitad en horizontal y vertical (5) y después cortamos por la línea dibujada (6). Nos quedan 8 triángulos (7); lo repetimos con la otra pareja y al final tenemos 8 cuadrados con triángulo de un color y 8 del otro (8). Ya podemos montar el bloque.
Colocamos las piezas como veis en el dibujo (9); hacemos cómo siempre: tira a tira, cosemos el primer cuadrado con el segundo, el tercero al segundo y acabamos cosiendo el cuarto al tercero, hasta tener las cuatro tiras (10). Antes de unir las tiras os explicaremos un truco de plancha, que hace más fácil el montaje del bloque: con las tiras cosidas, por detrás, planchamos las costuras de los cuadrados todas en la misma dirección; la tira que irá debajo del anterior se tiene que planchar de forma que las costuras vayan en dirección contraria a las de la tira de arriba. Esto nos permitirá encajar bien las costuras para coserlas.
Continuamos con el bloque. Una vez hemos planchado como os hemos explicado arriba, unimos las tiras; la primera con la segunda, la tercera con la segunda y la cuarta con la tercera (11). Y el bloque está acabado (12).
Como siempre, os dejamos la hoja con las medidas y cantidades; también el esquema del bloque (13) y cómo quedarían 4 bloques unidos (14).
Esperamos que esta Estrella de Colorado os haya gustado tanto como nosotras y os animéis a hacerla. Es muy fácil.


¡¡¡DE ESTRELLA EN ESTRELLA, UNA CONSTELACIÓN!!!


COLORADO STAR: PATCHWORK TUTORIAL.

In this post, Les Antònies return with the stars. We have learned to make this so easy block with the tutorial of the Missouri Star Quilt Company posted on YouTube. As always, we leave you the video link and add the drowned tutorial.
We start. We need 2 squares of plain or white colour of 20cmX20cm and 2 squares with different prints of 20cmX20cm, too (1). We match a patterned square and a smooth square and face them (2). Behind the white square, draw two diagonal lines, forming a cross (3); sew to each side of the lines a seam, leaving 0'5cm margin (4); once sewn it cut in half horizontally and vertically (5) and then we cut to the line drawn (6). We have 8 triangles (7); we repeat it with the other couple and at the end we have 8 squares with the triangle of a one colour and 8 of the other (8). We can set up the block.
Place the pieces as you can see in the drawing (9); we as always: strip to strip, sew the first square with the second, the third in the second and just sewing the fourth to the third, to have the four strips (10).  Before joining the strips we explain a iron trick, which makes it easier for the assembly of the block: with the strips sewn, behind, ironing the seams of the squares all in the same direction; the strip that will be below the previous one has been ironing board so that the seams are aligned in the direction opposite to the top of the strip. This will allow us to fit well the seams to sew them.
We continue with the block. Once we have ironing as we have explained above, we join the strips; the first with the second, the third with the second and the fourth with the third (11). And the block is finished (12).
As always, we leave the page with the measurements and quantities; also the layout of your block (13) and how would look 4 blocks united (14).
We hope that this Colorado Star you enjoyed it as much as we and you decide to do it. It is very easy.


STAR TO STAR, ONE CONSTELLATION!!!

UNA MICA D’AMOR ALS #DOMINGOSILUSTRADOS.

Aquest diumenge, Les Antònies, per celebrar Sant Valentí, compartim un parell de dibuixos inspirats en l’amor.
Les dues il·lustracions estan fetes sobre paper d’aquarel·la i el fons està treballat amb anilines o aquarel·la líquida difuminada i aiguada. Hem dibuixat doodles amb retoladors de diferents gruixos i, en el dibuix amb lettering, hem donat tocs amb llapis de colors.
Esperem que aquesta doble entrega us agradi i compensi les absències que hem tingut.
Com sempre, volem que compartiu amb nosaltres al grup de FB amb l’etiqueta #domingosilustrados els vostres doodles, dibuixos, mixed media, il·lustracions, collages, pintures i dissenys. Us esperem amb il·lusió.


SANT VALENTÍ VE PLE DE CORS I AMOR!!!


UN POCO DE AMOR EN LOS #DOMINGOSILUSTRADOS.

Este domingo, Les Antònies, para celebrar San Valentín, compartimos un par de dibujos inspirados en el amor.
Las dos ilustraciones están hechas sobre papel de acuarela y el fondo está trabajado con anilinas o acuarela líquida difuminada y aguada. Hemos dibujado doodles con rotuladores de diferentes gruesos y, en el dibujo con lettering, hemos dado toques con lápices de colores.
Esperamos que esta doble entrega os guste y compense las ausencias que hemos tenido.
Como siempre, queremos que compartáis con nosotros en el grupo de FB con la etiqueta #domingosilustrados vuestros doodles, dibujos, mixed media, ilustraciones, collages, pinturas y diseños. Os esperamos con ilusión.


¡¡¡SAN VALENTÍN VIENE LLENO DE CORAZONES Y AMOR!!!


A BIT OF LOVE TO THE #DOMINGOSILUSTRADOS.

This Sunday, Les Antònies, to celebrate Valentine's Day, share a couple of drawings inspired by love.
The two illustrations are made on watercolour paper and the background is worked with anilines or liquid watercolour washed. We have drawn doodles with markers of different thicknesses and, in the drawing with lettering, we have given a touch with colour pencils.
We hope that this dual delivery like you and make up for the absences that we've had.
As always, we want you to share with us in the FB group with the tag #domingosilustrados your doodles, drawings, mixed media, paintings, collages, illustrations and designs. We look forward with enthusiasm.


VALENTINE'S DAY COMES FILLED WITH HEARTS AND LOVE!!!

UN GRANNY EN TRES VERSIONS: TUTORIAL DE GANXET.

Una manera molt fàcil de fer grans labors de ganxet és utilitzar grannies, per això, Les Antònies us volem presentar un nou granny en tres versions per què pugueu escollir. Aquest granny l’hem trobat navegant per Pinterest i ens agrada moltíssim el resultat.
En aquest tutorial, a part de proporcionar-vos l’esquema us donarem, també, les indicacions per escrit volta a volta; ja veureu que és molt senzill.
Comencem amb 8 cadenetes. Unim per fer el cercle amb un punt lliscant.
Primera volta: 2 cadenetes + 15 barretes en punt alt.
Segona volta: 2 cadenetes + 2 cadenetes + 1 punt alt + 2 cadenetes fins a tenir 16 barretes.
Tercera volta: 2 cadenetes+ 2 punts alts + 1 cadeneta + 3 punts alts fins a tenir 16 grups de 3 barretes.
Quarta volta: 1 cadeneta + 3 cadenetes + punt baix + 3 cadenetes + punt baix + 3 cadenetes + punt baix + 5 cadenetes + punt baix i repetir la sèrie des de 3 cadenetes fins a tenir 4 cantonades.
Cinquena volta: 2 cadenetes + 8 punts alts + 5 punts alts + 2 cadenetes + 5 punts alts. Repetir  la sèrie des de els 8 punts alts.
Sisena volta: 2 cadenetes + 14 punts alts + 1 punt alt doble + 21 punts alts + 1 punt alt doble + 21 punts alts + 1 punt alt doble + 21 punts alts + 1 punt alt doble + 6 punts alts, unir amb un punt lliscant i ja tenim el nostre granny fet.
Nosaltres us hem  presentat tres versions: un granny monocolor; un granny bicolor i un granny multicolor. Esperem que us agradi tant com a nosaltres.


GRANNIES PER A TOTES LES SENSIBILITATS!!!

UN GRANNY EN TRES VERSIONES:  TUTORIAL DE GANCHILLO.

Una manera muy fácil de hacer grandes labores de ganchillo es usar grannies, por esto, Les Antònies os queremos presentar un nuevo granny en tres versiones para que podáis escoger. Este granny lo hemos encontrado navegando por Pinterest y nos gusta muchísimo el resultado.
En este tutorial, aparte de proporcionaros el esquema os daremos, también, las indicaciones por escrito vuelta a vuelta; ya veréis que es muy sencillo.
Empezamos con 8 cadenetas. Unimos para hacer el círculo con un punto deslizante.
Primera vuelta: 2 cadenetas + 15 barretas en punto alto.
Segunda vuelta: 2 cadenetas + 2 cadenetas + 1 punto alto + 2 cadenetas hasta tener 16 barretas.
Tercera vuelta: 2 cadenetas+ 2 puntos altos + 1 cadeneta + 3 puntos altos hasta tener 16 grupos de 3 barretas.
Cuarta vuelta: 1 cadeneta + 3 cadenetas + punto bajo + 3 cadenetas + punto bajo + 3 cadenetas + punto bajo + 5 cadenetas + punto bajo y repetir la serie desde 3 cadenetas hasta tener 4 esquinas.
Quinta vuelta: 2 cadenetas + 8 puntos altos + 5 puntos altos + 2 cadenetas + 5 puntos altos. Repetir  la serie desde los 8 puntos altos.
Sexta vuelta: 2 cadenetas + 14 puntos altos + 1 punto alto doble + 21 puntos altos + 1 punto alto doble + 21 puntos altos + 1 punto alto doble + 21 puntos altos + 1 punto alto doble + 6 puntos altos, unir con un punto deslizante y ya tenemos nuestro granny hecho.
Nosotras os hemos  presentado tres versiones: un granny monocolor; un granny bicolor y un granny multicolor. Esperamos que os guste tanto como a nosotras.


¡¡¡GRANNIES PARA TODAS LAS SENSIBILIDADES!!!


A GRANNY IN THREE VERSIONS: CROCHET TUTORIAL.

A very easy way to make great crochet work is to use grannies, for this reason, Les Antònies present you a new granny in three versions for which you can choose. This granny we found surfing Pinterest and we like a lot the result.
In this tutorial, apart from providing you the drawing scheme we will give you, also, the writing instructions round to round; as you will see that it’s very simple.
We started with 8 chains points. We unite to make the circle with a sliding point.
First round: 2 chains p. + 15 single treble point.
Second round: 2 chains p.  + 2 chains p. + 1 single treble point + 2 chains until you have 16 bars.
Third round: 2 chains p. + 2 single treble points + 1 chain p. + 3 single treble points up to 16 groups of 3 bars.
Fourth round: 1 chain p. + 3 chains p. + 1 double crochet p. + 3 chains p. + 1 double crochet p.  + 3 chains p. + 1 double crochet p.  + 5 chains p. + 1 double crochet p. and repeat the series from 3 chains p. since to have 4 corners.
Fifth round: 2 chains p. + 8 single treble points + 5 single treble points + 2 chains p. + 5 single treble points. Repeat the series from 8 single treble points.
Sixth round: 2 chains p. + 14 single treble points + 1 double treble crochet point + 21 single treble points + 1 double treble crochet p.  + 21 single treble points + 1 double treble crochet p. + 21 single treble points + 1 double treble crochet p. + 6 single treble points, united with a sliding point and already we have our granny done.
We have presented you three versions: a one colour granny; a bicolour granny and a multicolour granny. We hope you enjoy it as much as to us.


GRANNIES FOR ALL THE SENSITIVITIES!!!

FLORS I DOODLES ALS #DOMINGOSILUSTRADOS.

Aquest any els doodles seran protagonistes en molts dels treballs de Les Antònies i el dibuix que us presentem en aquest post és el primer de molts.
Damunt d’un paper d’aquarel·la, tintat amb anilines, hem dibuixat amb retoladors negres de diferents gruixos flors, ornaments, fulles i mandales. Per donar una mica de llum hem utilitzat un retolador blanc. L’aspecte envellit l’hem aconseguit amb ceres de colors que hem difuminat fent servir un paper i treballant en cercles.
Volem que continueu participant i gaudint dels dibuixos, il·lustracions, doodles, mixed media, collage i pintures al grup de FB amb l’etiqueta #domingosilustrados. Us esperem.


JOCS DE FORMES I ORNAMENTS!!!


FLORES Y DOODLES A LOS #DOMINGOSILUSTRADOS.

Este año los doodles serán protagonistas en muchos de los trabajos de Les Antònies y el dibujo que os presentamos en este post es el primero de muchos.
Sobre un papel de acuarela, tintado con anilinas, hemos dibujado con rotuladores negros de diferentes gruesos flores, ornamentos, hojas y mandalas. Para dar un poco de luz hemos utilizado un rotulador blanco. El aspecto envejecido lo hemos conseguido con ceras de colores que hemos difuminado usando un papel y trabajando en círculos.
Queremos que continuéis participando y disfrutando de los dibujos, ilustraciones, doodles, mixed media, collages y pinturas en el grupo de FB con la etiqueta #domingosilustrados. Os esperamos.


¡¡¡JUEGOS DE FORMAS Y ORNAMENTOS!!!


FLOWERS AND DOODLES TO THE #DOMINGOSILUSTRADOS.

This year the doodles will be the protagonists in many of the works of Les Antònies and the drawing that we are presenting in this post is the first of many.
On a watercolour paper, tinted with anilines, we have drawn with black marker pens of different thicknesses, ornaments, flowers, leaves and Mandalas. To give a bit of light we used a white marker. The aged we have achieved with colour waxes crayons that have blurred using a paper and working in circles.
We want you to continue participating and enjoying of drawings, illustrations, mixed media, collages, doodles, and paintings in the FB group with the tag #domingosilustrados. We look forward to.


GAMES OF SHAPES AND ORNAMENTS!!!

DIAMANTS CRAZY: TUTORIAL DE PATCHWORK.

El bloc que Les Antònies us volem presentar en aquest post és un experiment molt acolorit. Hem combinat el 9 màgic i la formació de diamants amb una tècnica molt senzilla.
Anem per feina i comencem el tutorial. Per fer el 9 màgic necessitem 9 quadrats diferents de 10cmX10cm (1); els distribuïm com més ens agradi i els cosim seguint la rutina de sempre: de tira en tira, unim el primer quadrat amb el segon i el tercer amb el segon fins a tenir 3 tires (2); continuem cosint les tires entre elles: la primera amb la segona i la tercera amb la segona (3) i ja tenim el nostre 9 cosit (4).
La segona part consisteix a tallar el 9 per la meitat, tant en vertical com en horitzontal (5) per obtenir 4 quadrats o mini blocs com en el dibuix (6). L’originalitat d’aquest bloc està en la següent passa: barregem els quadrats aleatòriament, sense parar gaire atenció i tallem en diagonal com us mostrem al dibuix (7) fins a obtenir 8 triangles (8); nosaltres hem respectat l’ordre, però si voleu ser més agosarats, podeu alternar, també, els triangles.
Entrem en la tercera i última part. Necessitem 4 tires de 4cmX19cm; hem de procurar que siguin més llargues que la diagonal dels triangles per treballar amb molta més comoditat (9). Centrem el triangle a la tira (10) els encarem i cosim (11); ara tenim un triangle amb tira (12) i hem d’acabar el quadrat cosint l’altre triangle i hem de procurar que quedi ben centrat (13); ho repetim amb la resta de triangles i els disposem en forma de diamant com veieu al dibuix (14). Només ens queda cosir els elements: per tires, cosim el primer quadrat amb el segon (15), amb les dues tires obtingudes (16) fem el mateix: cosim la tira superior amb l’inferior (17) i ja hem acabat el bloc (18).
En aquesta ocasió no us posem la mostra de teixit, però si us donem les mesures del material que necessitem; també us donem una idea de com quedarien 4 blocs units (19).
Esperem que us hagi agradat la idea i que el tutorial per fer diamants us hagi servit. Fins al proper tutorial de patchwork.


UN BOIG CAMP DE DIAMANTS!!!


DIAMANTES CRAZY: TUTORIAL DE PATCHWORK.

El bloque que Les Antònies os queremos presentar en este post es un experimento muy colorido. Hemos combinado el 9 mágico y la formación de diamantes con una técnica muy sencilla.
Pongámonos manos a la obra y empecemos el tutorial. Para hacer el 9 mágico necesitamos 9 cuadrados diferentes de 10cmX10cm (1); los distribuimos cuanto más nos guste y los cosemos siguiendo la rutina de siempre: de tira en tira, unimos el primer cuadrado con el segundo y el tercero con el segundo hasta tener 3 tiras (2); continuamos cosiendo las tiras entre ellas: la primera con la segunda y la tercera con la segunda (3) y ya tenemos nuestro 9 cosido (4).
La segunda parte consiste a cortar el 9 por la mitad, tanto en vertical como en horizontal (5) para obtener 4 cuadrados o mini bloques como en el dibujo (6). La originalidad de este bloque está en el siguiente paso: mezclamos los cuadrados aleatoriamente, sin prestar mucha atención y cortamos en diagonal como os mostramos en el dibujo (7) hasta obtener 8 triángulos (8); nosotras hemos respetado el orden, pero si queréis ser más osad@s, podéis alternar, también, los triángulos. 
Entramos en la tercera y última parte. Necesitamos 4 tiras de 4cmX19cm; tenemos que procurar que sean más largas que la diagonal de los triángulos para trabajar con mucha más comodidad (9). Centramos el triángulo a la tira (10) los encaramos y cosemos (11); ahora tenemos un triángulo con tira (12) y tenemos que acabar el cuadrado cosiendo el otro triángulo y tenemos que procurar que quede muy centrado (13); lo repetimos con el resto de triángulos y los disponemos en forma de diamante como veis en el dibujo (14). Sólo nos queda coser los elementos: por tiras, cosemos el primer cuadrado con el segundo (15), con las dos tiras obtenidas (16) hacemos lo mismo: cosemos la tira superior con la inferior (17) y ya hemos acabado el bloque (18).
En esta ocasión no os ponemos la muestra de tejido, pero si os damos las medidas del material que necesitamos; también os damos una idea de cómo quedarían 4 bloques unidos (19).
Esperamos que os haya gustado la idea y que el tutorial para hacer diamantes os haya servido. Hasta el próximo tutorial de patchwork.


¡¡¡UN LOCO CAMPO DE DIAMANTES!!!


CRAZY DIAMOND: PATCHWORK TUTORIAL.

The block that Les Antònies present in this post is a very colourful experiment. We've combined the magic 9 and the formation of diamonds with a very simple technique.
Let's get to work and start the tutorial. To make the magic 9 we need 9 different 10cmX10cm (1) squares; we distribute them the more we like and sew them following the routine like always: strip to strip, join the first square with the second and the third with the second until you have 3 strips (2); continue sewing the strips between them: the first with the second and the third with the second (3) and we already have our 9 sewing (4).
The second part is to cut the 9 in half, both vertical and horizontal (5) to get 4 squares or mini blocks as in the drawing (6). The originality of this block is in the next step: we mix the squares randomly, without much attention and cut on the diagonal as we showed you in the drawing (7) until we have 8 triangles (8); we have respected the order, but if you want to be more daring, you can alternate, also, the triangles.
We are entering the third and final part. We need 4 strips of 4cmX19cm; we must ensure that they are longer than the diagonal of the triangles to work with much more comfort (9). We focus the triangle strip (10) face them and sew (11); we now have a triangle with a strip (12) and we need to finish the square sewing another triangle, and we have to make sure that it is very centred (13); we repeat it with the rest of triangles and have them in a diamond shape as you can see in the drawing (14). Only we sew the elements: by strips, sew the first square with the second (15), with two strips obtained (16) do the same: we sew the top strip to the lower (17) and we have already finished the block (18).
On this occasion we do not put the sample of tissue, but if we give you the measurements of the material that we need. We will also give you an idea of how would unite 4 blocks (19).
We hope you liked the idea and that the tutorial to make diamonds has served you. See you in the next patchwork tutorial.


CRAZY DIAMONDS FIELD!!!