TUTORIAL PATCHWORK: EL 9 MÀGIC I LA PRIMERA TRANSFORMACIÓ.

Ja sabeu que Les Antònies busquem diferents maneres de fer blocs. Aquesta vegada hem optat per repassar una altra vegada el 9 màgic i hem fet dues transformacions. En aquest post us presentarem la primera.
Per començar el tutorial, el primer que farem serà recordar com es fa el 9 màgic. Pel que tenim planejat, necessitem dos blocs de 9, per això us donarem el material doble i diferenciarem els blocs en A i B. Com podeu 
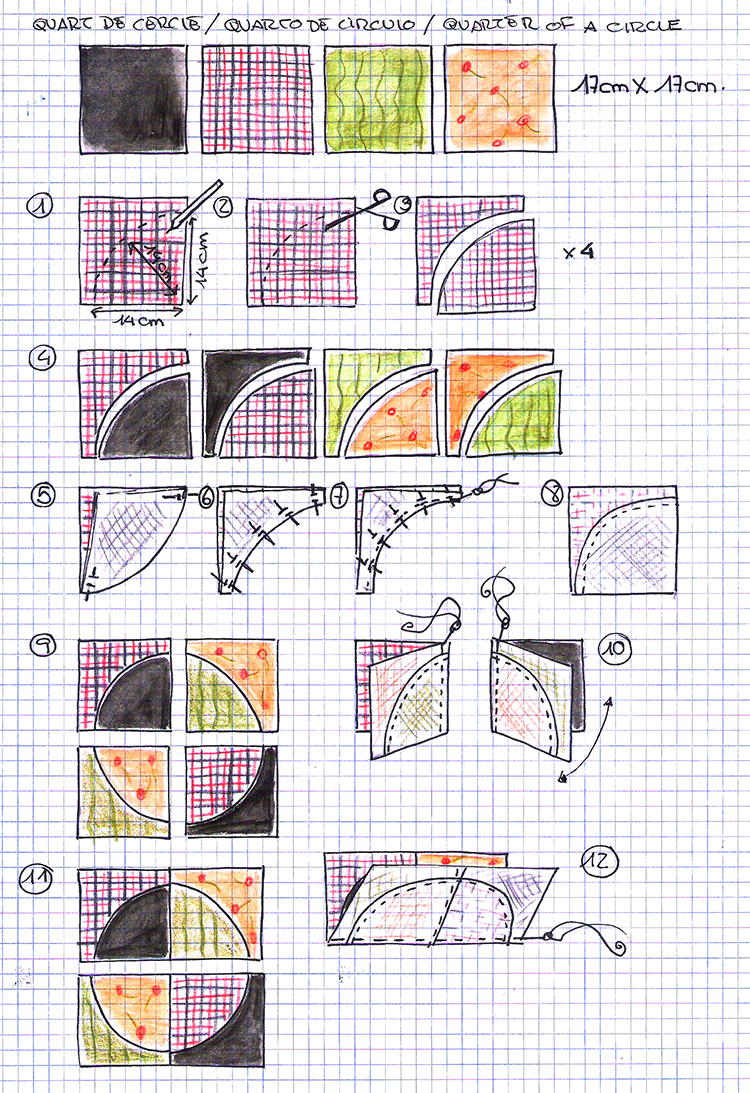
comprovar, farem servir 18 quadrats de 10cmX10cm: 9 per A i 9 per B (1); l’element comú és el quadrat central que és el mateix en els dos blocs. Us deixem, també, una mostra amb les mesures i quantitats dels dos blocs, que us serviran de petita guia per seguir el tutorial.
Distribuïm els quadrats com veieu en l’esquema (2) i comencem a cosir: de tira en tira, unim el primer quadrat amb el segon (3) i el tercer amb els anteriors (4); ja tenim tres tires cosides (5), ara toca unir-les entre elles: la primera a la central (6) i la tercera a les dues anteriors (7). I repetim el procés amb el bloc B.
Quan tenim els dos blocs fets (8), comencem la màgia. Retallem pel centre en horitzontal i en vertical (9) i acabem obtenint 4 mini blocs de cada bloc (10). Fins aquí el repàs del 9 màgic, ara toca fer les transformacions.

Primera transformació.

Agafem 4 mini blocs: 2 de l’A i 2 del B (1); han de ser diferents, els altres 4 els farem servir per a la segona transformació.
Distribuïm els mini blocs com en l’esquema (2); guieu-vos pel quadradet turquesa, ha de quedar a la part de dalt. Cosim com sempre: de tira en tira, el primer amb el segon (3). Amb les tires fetes (4) cosim la de dalt amb la d’abaix (5) i després de quadrar i planxar, ja tenim el bloc acabat (6). Us deixem una referència de com queden 9 blocs units (7).
Aquesta transformació és senzilla, però queda espectacular quan uneixes uns quants blocs. Us esperem a la segona transformació que serà una mica més complicada, però igual de bonica.


BARREJANT I COMBINANT!!!


TUTORIAL PATCHWORK: EL 9 MÁGICO Y LA PRIMERA TRANSFORMACIÓN.

Ya sabéis que Les Antònies buscamos diferentes maneras de hacer bloques. Esta vez hemos optado para repasar otra vez el 9 mágico y hemos hecho dos transformaciones. En este post os presentaremos la primera.
Para empezar el tutorial, lo primero que haremos será recordar cómo se hace el 9 mágico. Para lo que tenemos planeado, necesitamos dos bloques de 9, por eso os daremos el material doble y diferenciaremos los bloques en A y B. Cómo podéis comprobar, usaremos 18 cuadrados de 10cmX10cm: 9 para A y 9 para B (1); el elemento común es el cuadrado central que es el mismo en los dos bloques. Os dejamos, también, una muestra con las medidas y cantidades de los dos bloques, que os servirán de pequeña guía para seguir el tutorial.
Distribuimos los cuadrados como veis en el esquema (2) y empezamos a coser: de tira en tira, unimos el primer cuadrado con el segundo (3) y el tercero con los anteriores (4); ya tenemos tres tiras cosidas (5), ahora toca unirlas entre ellas: la primera a la central (6) y la tercera a las dos anteriores (7). Y repetimos el proceso con el bloque B.
Cuando tenemos los dos bloques hechos (8), empezamos la magia. Recortamos por el centro en horizontal y en vertical (9) y acabamos obteniendo 4 mini bloques de cada bloque (10). Hasta aquí el repaso del 9 mágico, ahora toca hacer las transformaciones. 

Primera transformación.

Cogemos 4 mini bloques: 2 del A y 2 del B (1); tienen que ser diferentes, los otros 4 los usaremos para la segunda transformación.
Distribuimos los mini bloques como en el esquema (2); guiaos por el cuadradito turquesa, tiene que quedar en la parte de arriba. Cosemos como siempre: de tira en tira, el primero con el segundo (3). Con las tiras hechas (4) cosemos la de arriba con la de abajo (5) y después de cuadrar y planchar, ya tenemos el bloque acabado (6). Os dejamos una referencia de cómo quedan 9 bloques unidos (7).
Esta transformación es sencilla, pero queda espectacular cuando unes unos cuántos bloques. Os esperamos en la segunda transformación que será algo más complicada, pero igual de bonita.


¡¡¡MEZCLANDO Y COMBINANDO!!!


PATCHWORK TUTORIAL: MAGIC 9 AND THE FIRST TRANSFORMATION.

As you know, Les Antònies are looking for different ways to make blocks. This time we have chosen to review again the magic 9 and we have made two changes. In this post we present to you the first.
To start the tutorial, the first thing we will do will be to remember how to make the magic 9. So, for what we have planned, we need two blocks of 9, so we'll give you the material and differentiate the blocks in A and B. As you can see, we'll use 18 10cmX10cm squares: 9 for A and 9 for B (1); the common element is the central square that is the same in the two blocks. Here we leave you a sample with the measurements and quantities of the two blocks, which will serve you as a small guide to follow the tutorial.
We distribute the squares as you can see in the schematic (2) and start to sew: strip to strip, join the first with the second square (3) and the third with the previous (4); we already have three strips sewn (5), now we have to unite them, among them: the first one in the central (6) and the third in the previous two (7). And we repeat the process with the B block.
When we have the two blocks made (8), we start the magic. We cut through the centre horizontally and vertically (9) and we ended up getting 4 mini blocks of each block (10). Here the review of 9, now we have to make the changes.

The first transformation.

We take 4 mini blocks: 2 from A and 2 from B (1); they have to be different, the other 4 we will use for the second transformation.
We distribute the mini blocks as in the scheme (2); you are guiding through the turquoise tinny square, should be at the top. Sew as always: strip to strip, the first with the second (3). With the strips made (4) sew the above with the below (5) and then, after fit and iron, we already have the block finish (6). We leave a reference as how look 9 blocks together (7).
This transformation is simple, but it is spectacular when you join a few blocks. We look forward to the second transformation that is going to be a little more complicated, but just as beautiful.


MIXING AND MATCHING!!!


UN EXPERIMENT DE LES ANTÒNIES: DOS NECESSERS.

Si ens seguiu de fa temps, ja sabeu que de tant en tant, Les Antònies, fem experiments. En aquesta ocasió hem provat una combinació de pintura i costura.
Hem fet dos necessers pintats a mà. Damunt d’una tela de cotó, amb el revers plastificat, fent servir pintura acrílica que és resistent a l’aigua, hem fet un dibuix dels nostres. La gràcia de la pintura acrílica és que es pot treballar com l’oli o la tempera, fent capes i barrejant directament i, a més, és d’assecat ràpid, cosa que et permet donar tocs amb retoladors permanents, per perfilar el dibuix. Aquesta és la part fàcil.
La part difícil és posar la cremallera. No us hem fet un tutorial, perquè encara no ho dominem prou per a donar-vos una explicació correcta. Quan ja ho tinguem per la mà i fem algun altre necesser o bossa ja us farem l’esquema pertinent.
Malgrat haver-nos barallat amb la part de la costura i haver fet i desfet diverses vegades, el resultat d’aquest experiment ens agrada. Hem de perfeccionar la tècnica, perquè ens ve de gust fer-ne uns quants més. Nosaltres lluirem aquests dos necessers. No són perfectes, però són bonics.
Què us semblen? Ens agradaria saber que  penseu i ens feu arribar el vostre parer.


COMBINACIÓ GUANYADORA: PINTURA I COSTURA!!!


UN EXPERIMENTO DE LES ANTÒNIES: DOS NECESERES.
Si nos seguís de hace tiempo, ya sabéis que de vez en cuando, Les Antònies, hacemos experimentos. En esta ocasión hemos probado una combinación de pintura y costura.
Hemos hecho dos neceseres pintados a mano. Encima de una tela de algodón, con el reverso plastificado, usando pintura acrílica que es resistente al agua, hemos hecho un dibujo de los nuestros. La gracia de la pintura acrílica es que se puede trabajar como el oleo o la tempera, haciendo capas y mezclando directamente y, además, es de secado rápido, cosa que te permite dar toques con rotuladores permanentes, para perfilar el dibujo. Esta es la parte fácil.
La parte difícil es poner la cremallera. No os hemos hecho un tutorial, porque todavía no lo dominamos bastante como para daros una explicación correcta. Cuando ya lo tengamos por la mano y hagamos alguno otro neceser o bolsa ya os haremos el esquema pertinente. 
A pesar de habernos peleado con la parte de la costura y haber hecho y deshecho varías veces, el resultado de este experimento nos gusta. Tenemos que perfeccionar la técnica, porque nos apetece hacer unos cuantos más. Nosotras luciremos estos dos neceseres. No son perfectos, pero son bonitos.
¿Qué os parecen? Nos gustaría saber que pensáis y hacednos llegar vuestro parecer.


¡¡¡COMBINACIÓN GANADORA: PINTURA Y COSTURA!!!


AN EXPERIMENT OF LES ANTÒNIES: TWO MAKE-UP BAGS.

If you follow us from time ago, you know that from time to time, Les Antònies, do experiments. This time we tried a combination of painting and sewing.
We have done two make-up bags, hand-painted. On top of cotton fabric, with the back plasticize; using acrylic paint that is resistant to water, we have made a drawing of ours. The fun of the acrylic paint is that it can work as the oil or tempera, doing layers and blending directly, and also quick-drying, which allows you to give touches with permanent markers, to contour drawing. This is the easy part.
The hard part is to sew the zipper. We have not done a tutorial, because we still don't dominate enough to give you a correct explanation. When we already have it by the hand and do any other make-up bag or purse we are going to do the relevant scheme.
Despite having fought with the part of the sewing and have done and undone several times, we like the result of this experiment. We have to perfect the technique, because we want to make a few more. We show off these two make-up bags. They aren't perfect, but they are nice.
What do you think? We'd like to know what you think and send us your opinion.


THE WINNING COMBINATION: PAINTING AND SEWING!!!

HALLOWEEN O LA CASTANYADA ALS #DOMINGOSILUSTRADOS.

El cap de setmana vinent es celebra el dia de tots sants i, Les Antònies, volem fer un petit recordatori de les festes que s’organitzen. Uns celebren Halloween i d’altres celebrem la Castanyada; fins i tot hi ha qui combina les dues, encara que, de moment, no te nom (a casa li diem “guendolin” en homenatge al López de la sèrie “Plats Bruts” de TV3).
Hem volgut representar les dues festes amb dos personatges característics: la bruixa, per Halloween i la castanyera, per la Castanyada, envoltades dels seus complements.
El dibuix és una combinació de tècniques: llapis de color aquarel·lable, aquarel·la, ceres i retoladors diversos.
Nosaltres no faltarem a la nostra cita de cada diumenge a FB. Us esperem amb els vostres doodles, il·lustracions, mixed media, dibuixos, pintures, collages... tot amb l’etiqueta #domingosilustrados.


JUGUEM A LES DIFERÈNCIES!!!


HALLOWEEN O LA CASTANYADA EN LOS #DOMINGOSILUSTRADOS.

El próximo fin de semana se celebra el día de todos santos y, Les Antònies, queremos hacer un pequeño recordatorio de las fiestas que se organizan. Unos celebran Halloween y otros celebramos la Castanyada; incluso hay quién combina las dos, aunque, de momento, no tiene nombre (en casa decimos “guendolin” en homenaje a López de la serie “Plats Bruts” de TV3).
Hemos querido representar las dos fiestas con dos personajes característicos: la bruja, para Halloween y la castañera, para la Castanyada, rodeadas de sus complementos.
El dibujo es una combinación de técnicas: lápiz de color acuarelables, acuarela, ceras y rotuladores diversos.
Nosotras no faltaremos a nuestra cita de cada domingo en FB. Os esperamos con vuestros doodles, ilustraciones, mixed media, dibujos, pinturas, collages... todo con la etiqueta #domingosilustrados.

¡¡¡JUGUEMOS A LAS DIFERENCIAS!!!


HALLOWEEN OR LA CASTANYADA TO THE #DOMINGOSILUSTRADOS.

The next weekend it’s celebrated the All Saints Day, and Les Antònies, want to make a small reminder of the parties which are organized. Some celebrate Halloween and others celebrate la Castanyada; there are even those who combines the two, although, for the time being, has no name (at home we say "guendolin" in tribute to López of TV3 series “Plats bruts” or “Dirty Dishes” in English).
We wanted to represent the two parties with two typical characters: the witch, for Halloween and the chestnuts roasting, for la Castanyada, surrounded by of their add-ons.
The drawing is a combination of techniques: watercolour pencil, watercolour, waxes and different markers.
We don't miss our appointment of every sunday on FB. We look forward to your doodles, illustrations, mixed media, drawings, paintings, collages ... all with the tag #domingosilustrados.


WE PLAY ON THE DIFFERENCES!!!

TUTORIAL PATCHWORK: JELLYROLL RACE.

En aquest tutorial, Les Antònies us volem explicar les beceroles de l’anomenada JellyRoll Race. Nosaltres ho hem fet en petit i amb retalls, però normalment es fa amb les tires pre-tallades dels JellyRolls i es poden confeccionar vànoves multicolors, de la mesura que es desitgi.
Nosaltres hem fet servir 20 tires de 45cmX6cm (1), però podeu adaptar-ho a les vostres necessitats: més tires, més llargues o més amples, la manera de treballar és la mateixa; si teniu  un JellyRoll no cal fer res, s’utilitza tal com està.
Quan ja tenim les tires hem d’unir-les en una tira llarga, tan llarga com tires tinguem. La tècnica d’unió és la següent: agafem dues tires i una d’elles s’encara amb l’altre de la manera que veiem en l’esquema (2), formant una L; cosim en diagonal i, una vegada cosida, retallem deixant un marge de 0’5cm +o- des de la costura (3). Quan obrim ens ha de quedar com en el dibuix (4). Ho fem amb totes les tires fins acabar-les obtenint una tira, per dir-ho d’alguna manera, quilomètrica (5).
Ara ve la part divertida i sorprenent. Agafem una punta de la tira i la unim amb l’altra punta; es a dir, pleguem per la meitat (6). Cosim per un costat de dalt a baix de la tira plegada (7); tallem pel plec (8), obrim (9) i tenim dues tires cosides (10). Repetim l’operació: pleguem per la meitat, de dalt a baix (11); cosim per una banda (12); tallem pel plec (13) i, quan obrim, ja tenim quatre tires cosides (14). Ho hem de fer fins a tenir la mesura que necessitem; la nostra és petita, per fer un coixí rectangular una mica gran, perquè només hem fet servir 20 tires no gaire llargues; també hem afegit cintes i tapapunts per donar algun toc diferent, però això és totalment optatiu. A YouTube, hi ha un munt de vídeos explicant aquesta tècnica, si voleu veure algun us deixem l’enllaç del tutorial de Missouri Star Quilt Company, on fan una vànova.
Esperem que us hagi agradat i goseu de provar aquesta tècnica senzilla i divertida, que pot donar uns resultats sorprenents.


UNA CURSA COSIDA!!!


TUTORIAL PATCHWORK: JELLYROLL RACE.

En este tutorial, Les Antònies os queremos explicar los rudimentos de la llamada JellyRoll Race. Nosotras lo hemos hecho en pequeño y con retales, pero normalmente se hace con las tiras pre-cortadas de los JellyRolls y se pueden confeccionar colchas multicolores, de la medida que se desee.
Nosotras hemos usado 20 tiras de 45cmX6cm (1), pero podéis adaptarlo a vuestras necesidades: más tiras, más largas o más anchas, la manera de trabajar es la misma; si tenéis  un JellyRoll no se ha de hacer nada, se usa tal como está.
Cuando ya tenemos las tiras tenemos que unirlas en una tira larga, tan larga como tiras tengamos. La técnica de unión es la siguiente: cogemos dos tiras y una de ellas se encara con la otra de la manera que vemos en el esquema (2), formando una L; cosemos en diagonal y, una vez cosida, recortamos dejando un margen de 0’5cm +o- desde la costura (3). Cuando abrimos nos ha de quedar como en el dibujo (4). Lo hacemos con todas las tiras hasta acabarlas obteniendo una tira, por decirlo de alguna manera, quilométrica (5).
Ahora viene la parte divertida y sorprendente. Cogemos una punta de la tira y la unimos con la otra punta; es decir, plegamos por la mitad (6). Cosemos por un lado de arriba a abajo de la tira plegada (7); cortamos por el pliegue (8), abrimos (9) y tenemos dos tiras cosidas (10). Repetimos la operación: plegamos por la mitad, de arriba a abajo (11); cosemos por un lado (12); cortamos por el pliegue (13) y, cuando abrimos, ya tenemos cuatro tiras cosidas (14). Lo tenemos que hacer hasta tener la medida que necesitamos; la nuestra es pequeña, para hacer un cojín rectangular un poco grande, porqué solo hemos usado 20 tiras no muy largas; también hemos añadido cintas y tapapuntos para dar algún toque diferente, pero esto es totalmente optativo. En YouTube, hay muchos vídeos explicando esta técnica, si queréis ver  alguno os dejamos el enlace del tutorial de Missouri Star Quilt Company, donde hacen una colcha.
Esperamos que os haya gustado y os atreváis a probar esta técnica sencilla y divertida, que puede dar unos resultados sorprendentes.


¡¡¡UNA CARRERA COSIDA!!!


TUTORIAL: PATCHWORK JELLYROLL RACE.

In this tutorial, Les Antònies want to explain the origins of the so-called JellyRoll Race. We've made it small and with cut-outs, but it’s usually made with pre-cut strips of JellyRolls and can be multicoloured bedspreads, make in the size that you want.
We used 20 strips of 45cmX6cm (1), but you can adapt it to your needs: more strips, longer or wider, the way of working is the same; If you have a JellyRoll you don't need to do anything, it is used as is.
When we have the strips we have to stitch them together into a long strip, as long as strips we have. The binding technique is the following: take two strips and one of them facing each other in the way that we see in the outline (2), forming an L; sew diagonally, and once stitched, you cut it, leaving a margin of 0’5 cm + or- from a couture (3). When we open, we should be as in the drawing (4). We do this with all the strips until the end of them getting a strip, to put it in some way, kilometre-long (5).
Now comes the fun part and surprising. Take a tip from the strip and join with the other side. That is to say, let's fold it in half (6). Sew from top to bottom on one side of the folded strip (7); we cut through the crease (8), open (9) and we have two strips sewn (10). Repeat the operation: Let's fold it in half, from top to bottom (11); sew on the one side (12); we cut through the crease (13) and, when we open, we already have four strips sewn (14). We have to do to get as much as we need; ours is small, to make a rectangular pad a bit, because we have only used 20 strips not too long; we have also added ribbons and other ornaments to give a different twist, but this is entirely optional. On YouTube, there are a lot of videos explaining this technique, if you want to see some here the link of the tutorial of Missouri Star Quilt Company, where they make a quilt.
We hope you enjoyed it and dared to try this simple and fun technique, which can give amazing results.


A STITCHED RACE!!!


MINI ÀLBUM “DE PLEC A PLEC”: TUTORIAL SCRAPBOOK.

En aquest post dedicat a l’scrapbook, Les Antònies, us presentem un mini àlbum fàcil, ràpid i fent servir molt poc les tisores.
Comencem amb el tutorial. La base del mini àlbum és una cartolina de 50cmX35cm (1); nosaltres hem treballat amb cartolina blanca, però podeu fer servir qualsevol color; millor si no és molt gruixuda, ja que hem de fer plecs. La primera cosa que fem és plegar per la meitat (2), com si fos una carpeta; obrim i pleguem els laterals cap al centre (3), ens han de quedar 4 espais de 12’5cmx35cm. Obrim i per la part d’abaix, fem un plec de 14’5cm (4), per marcar les butxaques. Retallem fins al plec horitzontal, tal com veieu al dibuix (5), per separar les butxaques laterals de la central, que en el nostre cas la farem una mica més curta que les dels costats (6), més o menys a 8cm. Ja tenim la base feta (7) i marquem bé com volem les butxaques (8) per començar la decoració bàsica.
Girem la base del mini àlbum i, amb papers d’estampats diferents o llisos, definirem les portades i contra portades (9): fixeu-vos que les dues parts centrals són les portades i les dues parts exteriors les primeres pàgines interiors. Abans d’enganxar les butxaques, decorem les pàgines amb papers estampats, com vosaltres vulgueu i una vegada fet, amb cel·lo de doble cara o cola, enganxem només els laterals de les butxaques (10); nosaltres també hem enganxat pel centre la butxaca del mig. Ja podem decorar les butxaques (11). Per acabar, només ens queda posar un cordill, per poder tancar el mini àlbum, que enganxarem al centre del mateix i que cobrirem amb una peça d’uns 5cm d’ample que farà la funció de llom del mini àlbum (12).
La part que queda és la creativa i personal: decoreu la portada com us agradi més, afegint lletres, botons, dibuixos o altres ornaments; feu el mateix amb les pàgines interiors. També podeu afegir etiquetes, i bases per poder posar fotografies, com nosaltres hem fet.
Esperem que us agradi la idea i que a partir d’aquí pugueu crear el vostre propi mini àlbum.


EL TOC DE LA SIMPLICITAT!!!


MINI ÁLBUM “DE PLIEGUE A PLIEGUE”: TUTORIAL SCRAPBOOK.

En este post dedicado al scrapbook, Les Antònies, os presentamos un mini álbum fácil, rápido y usando muy poco las tijeras.
Empezamos con el tutorial. La base del mini álbum es una cartulina de 50cmX35cm (1); nosotras hemos trabajado con cartulina blanca, pero podéis usar cualquier color; mejor si no es muy gruesa, puesto que tenemos que hacer pliegues. La primera cosa que hacemos es plegar por la mitad (2), como si fuera una carpeta; abrimos y plegamos los laterales hacia el centro (3), nos tienen que quedar 4 espacios de 12’5cmx35cm. Abrimos y por la parte de abajo, hacemos un pliegue de 14’5cm (4), para marcar los bolsillos. Recortamos hasta el pliegue horizontal, tal como veis en el dibujo (5), para separar los bolsillos laterales del central, que en nuestro caso lo haremos algo más corto que los de los lados (6), más o menos a 8cm. Ya tenemos la base hecha (7) y marcamos bien como queremos los bolsillos (8) para empezar la decoración básica.
Giramos la base del mini álbum y, con papeles de estampados diferentes o lisos, definiremos las portadas y contraportadas (9): fijaos que las dos partes centrales son las portadas y las dos partes exteriores las primeras páginas interiores. Antes de pegar los bolsillos, decoramos las páginas con papeles estampados, como vosotr@s queráis y una vez hecho, con celo de doble cara o pegamento, pegamos sólo los laterales de los bolsillos (10); nosotras también hemos pegado por el centro el bolsillo del medio. Ya podemos decorar los bolsillos (11). Para acabar, sólo nos queda poner un cordel, para poder cerrar el mini álbum, que pegaremos en el centro del mismo y que cubriremos con una pieza de unos 5cm de ancho que hará la función de lomo del mini álbum (12). 
La parte que queda es la creativa y personal: decorad la portada como os guste más, añadiendo letras, botones, dibujos u otros ornamentos; haced lo mismo con las páginas interiores. También podéis añadir etiquetas, y bases para poder poner fotografías, como nosotras hemos hecho.
Esperamos que os guste la idea y que a partir de aquí podáis crear vuestro propio mini álbum.


¡¡¡EL TOQUE DE LA SIMPLICIDAD!!!


MINI ALBUM "FOLD TO FOLD": SCRAPBOOK TUTORIAL.
In this post dedicated to the scrapbook, Les Antònies, are presenting you a mini album easy, fast and with a very little use of the scissors.
Let's start with the tutorial. The base of the mini album is a cardboard of 50cmX35cm (1); we have worked with white cardboard, but you can use any colour; best if it is not very thick, as we need to make folds. The first thing you do is fold in half (2), as if it were a folder; open and fold the sides towards the centre (3), we should be 4 spaces of 12'5cmx35cm. Open, and in the part below, make a fold of 14'5cm (4), to mark the pockets. We cut since to the horizontal fold, as you can see in the drawing (5), to separate the side pockets of the central pocket which, in our case, we will do a little shorter than the sides (6), more or less at 8cm. We already have done the base (7) and we mark well how we want the pockets (8) to begin with the basic decoration.
Turn the base of the mini album and, with different patterned or smooth papers, define the covers (9): note that the two central parts are the covers and the two outer parts the first interior pages. Before you paste the pockets, we decorate the pages with patterned papers, as you want, and once done, with double-sided adhesive or glue, attach only the sides of the pockets (10); we also have stuck by the centre the middle pocket. We can decorate the pockets (11). Finally, we can only put a cord, in order to close the mini album, which we glued in the centre and cover with a piece of a 5 cm wide cardboard that will make the function of the spine of the mini album (12).
The last part is the creative and personal: decorating the cover how do you like more, adding letters, buttons, drawings or other ornaments; do the same with the interior pages. You can also add tags, and cards to be able to put pictures, as we have done.
We hope you like the idea and from here you can create your own mini album.


THE TOUCH OF SIMPLICITY!!!

ROMANTICISME ALS #DOMINGOSILUSTRADOS.

Aquest diumenge, Les Antònies, participem en els #domingosilustrados amb una altra il·lustració de moda.
Hem realitzat el dibuix amb tinta xinesa negra, com ja hem fet d’altres vegades. Aquesta tècnica és perfecte per marcar els contrastos i imitar les fotografies en blanc i negre. Hem donat llum amb pinzellades de témpera blanca. Anteriorment ja us hem explicat com es treballa, però sempre va bé recordar-ho: es dilueix amb aigua destil·lada i es va pintant capa a capa, de més clara a més fosca.
Ens trobareu a FB i podeu participar amb els vostres doodles, dibuixos, il·lustracions, dissenys, mixed media o collages amb l’etiqueta #domingosilustrados.


EL BLANC I EL NEGRE PER VIATJAR EN EL TEMPS!!!


ROMANTICISMO A LOS #DOMINGOSILUSTRADOS.

Este domingo, Les Antònies, participamos en los #domingosilustrados con otra ilustración de moda.
Hemos realizado el dibujo con tinta china negra, como ya hemos hecho otras veces. Esta técnica es perfecta para marcar los contrastes e imitar las fotografías en blanco y negro. Hemos dado luz con pinceladas de témpera blanca. Anteriormente ya os hemos explicado cómo se trabaja, pero siempre va bien recordarlo: se diluye con agua destilada y se va pintando capa a capa, de más clara  a más oscura.
Nos encontraréis en FB y podéis participar con vuestros doodles, dibujos, ilustraciones, diseños, mixed media o collages con la etiqueta #domingosilustrados.

¡¡¡EL BLANCO Y EL NEGRO PARA VIAJAR EN EL TIEMPO!!!

  
ROMANTICISM TO THE #DOMINGOSILUSTRADOS.

This sunday, Les Antònies, participate in the #domingosilustrados with another fashion illustration.
We have done the drawing with black Chinese ink, as we have done on other occasions. This technique is perfect for marking the contrast and mimics the black and white’s photos. We have given light with brushstrokes of white témpera. We have previously explained how it works, but it was always good to remember: diluted with distilled water and was painting layer to layer, lighter to darker.
You can find us on FB and you can participate with your doodles, drawings, illustrations, designs, mixed media and collages with the tag #domingosilustrados.


THE WHITE AND BLACK TO TRAVEL BACK IN TIME!!!

TENNESSEE STAR: TUTORIAL PATCHWORK.

Una de les coses més característiques del patchwork són els estels. En aquest tutorial, a part de repassar una altra manera de fer quadrats amb triangle, Les Antònies us presentem un nou model d’estel: la Tennessee Star.
Comencem pels materials: necessitem 4 quadrats en un color llis de 12cmX12cm; 2 quadrats de cada en quatre estampats diferents, també, de 12X12cm i quatre quadrats en diferents colors, a poder ser llisos, de 10’5cmX10’5cm. Fem les parelles tal com podeu veure a l’esquema i deixem de banda, de moment, els quatre quadrats petits de color.
Agafem una de les parelles i l’encarem; dibuixem, amb un llapis, una diagonal al darrera d’un dels quadrats (1). Cosim una costura a banda i banda de la línia dibuixada (2); retallem pel mig de les costures, seguint la línia (3); ja tenim dos quadrats amb triangle (4). Ho fem amb totes les parelles i obtenim 12 quadrats amb triangle tal com veieu en l’esquema (5).
Ara ja tenim tot el que necessitem per fer el bloc. Després de quadrar i planxar, distribuïm tots els quadrats (6). Comencem a muntar. Com podeu comprovar el bloc és simètric, per això només us hem dibuixat les dues primeres tires, perquè les altres es fan exactament igual. Unim el segon quadrat al primer (7), afegim el tercer (8) i acabem amb el quart (9). Ja tenim les quatre tires. Continuem muntant: cosim la segona tira amb la primera (11); la quarta tira amb la tercera (12) i acabem unint les dues parts pel centre: es a dir la tercera tira a la segona (13). Amb això ja tenim el bloc acabat (14).
Hem volgut ensenyar-vos com quedarien quatre blocs units (15). Com podeu veure l’efecte és molt acolorit. Si voleu que sigui més net i tingui un aire més clàssic, podeu substituir els quadrats de colors de la cantonada, per quadrats del mateix color que el fons o en un altre color, però tots iguals. També us deixem les mesures i quantitats de tela per fer el bloc.
Esperem haver-vos inspirat amb un altre estel, en la més pura tradició patchwork.


SIMETRIA PER ARRIBAR FINS AL CEL!!!


TENNESSEE STAR: TUTORIAL PATCHWORK.

Una de las cosas más características del patchwork son las estrellas. En este tutorial, aparte de repasar otra manera de hacer cuadrados con triangulo, Les Antònies os presentamos un nuevo modelo de estrella: la Tennessee Star.
Comenzamos por los materiales: necesitamos 4 cuadrados en un color liso de 12cmX12cm; 2 cuadrados de cada en cuatro estampados diferentes, también, de 12X12cm y cuatro cuadrados en diferentes colores, a poder ser lisos, de 10’5cmX10’5cm. Hacemos las parejas tal como podéis ver en el esquema y dejamos de lado, de momento, los cuatro cuadrados pequeños de color.
Cogemos una de las parejas y la encaramos; dibujamos, con un lápiz, una diagonal detrás de uno de los cuadrados (1). Cosemos una costura a lado y lado de la línea dibujada (2); recortamos por el medio de las costuras, siguiendo la línea (3); ya tenemos dos cuadrados con triangulo (4). Lo hacemos con todas las parejas y obtenemos 12 cuadrados con triangulo tal como veis en el esquema (5).
Ahora ya tenemos todo lo que necesitamos para hacer el bloque. Después de cuadrar y planchar, distribuimos todos los cuadrados (6). Empezamos a montar. Como podéis comprobar el bloque es simétrico, por esto solo os hemos dibujado las dos primeras tiras, porqué las otras se hacen exactamente igual. Unimos el segundo cuadrado al primero (7), añadimos el tercero (8) y acabamos con el cuarto (9). Ya tenemos las cuatro tiras. Continuamos montando: cosemos la segunda tira con la primera (11); la cuarta tira con la tercera (12) y acabamos uniendo las dos partes por el centro: es decir la tercera tira a la segunda (13). Con esto ya tenemos el bloque acabado (14).
Hemos querido enseñaros como quedarían cuatro bloques unidos (15). Como podéis ver, el efecto es muy colorido. Si queréis que sea más limpio y tenga un aire más clásico, podéis substituir los cuadrados de colores de la esquina, por cuadrados del mismo color que el fondo en otro color, pero todos iguales. También os dejamos las medidas y cantidades de tela para hacer el bloque.
Esperamos haberos inspirado con otra estrella, en la más pura tradición patchwork.


¡¡¡SIMETRÍA PARA LLEGAR HASTA EL CIELO!!!

            
TENNESSEE STAR: PATCHWORK TUTORIAL.

One of the most characteristics of patchwork are the stars. In this tutorial, in part to review another way to make squares with triangle, Les Antònies are presenting a new model of star: the Tennessee Star.
We started by materials: need 4 squares in a smooth colour of 12cmX12cm; 2 squares of each in four different prints, too, 12X12cm and four squares in different colours, can be smooth, 10'5cmX10'5 cm. Make couples such as you can see in the scheme and leave aside, for the moment, the four small squares of colour.
We take one of the couples and face it; with a pencil, draw a diagonal behind one of the squares (1). We sew a seam on either side of the drawn line (2); we cut through the seams, in line (3); we already have two squares with triangle (4). We do this with all couples and we get 12 squares with triangle as you can see in the diagram (5).
Now we have everything we need to make the block. After squaring and ironing, we distribute all the squares (6). We began to mount. As you can see, the block is symmetrical, so only we have drawn the first two strips, because the others are exactly equal. We join the second square to the first (7), add the third (8) and ended up with the fourth (9). We already have four strips. We continued mounting: we sew the second strip with the first (11); the fourth strip with the third (12) and just joining the two parts by the centre: i.e. the third strip to the second (13). With this we have finished the block (14).
We wanted to show you as four blocks together (15) would be. As you can see, the effect is very colourful. If you want to be clean and have a more classical air, you can replace the colour squares of the corner, by squares of the same colour as the background or in a different colour, but all the same. We also leave you the measures and amounts of fabric to make the block.
We hope to have inspired you with another star, in the most pure tradition of patchwork.


SYMMETRY TO REACH THE SKY!!!

POMES DE TARDOR ALS #DOMINGOSILUSTRADOS.

A Les Antònies ens encanten els doodles, per això, com teníem un fons tintat i un projecte de pomes dibuixat, l’hem transformat en un gargot en tota regla.
Com us hem dit més amunt, el fons està tenyit amb aquarel·les líquides o anilines; damunt del fons sec hem pintat, també amb aquarel·les unes pomes. Hem deixat assecar i hem començat a dibuixar el nostre doodle amb diferents retoladors: negres, punta fina, efecte pinzell, blancs i metal·litzats. Ens hem deixat portar per la inspiració del moment.
Ens podreu trobar a FB i si voleu participar amb els vostres doodles, il·lustracions, dibuixos, mixed media, collages o pintures, només ho heu de posar l’etiqueta #domingosilustrados.


POMES DE TARDOR, DOODLES DE TARDOR!!!


MANZANAS DE OTOÑO EN LOS #DOMINGOSILUSTRADOS.

A Les Antònies nos encantan los doodles, por eso, como teníamos un fondo tintado y un proyecto de manzanas dibujado, lo hemos transformado en un garabato en toda regla.
Cómo os hemos dicho más arriba, el fondo está teñido con acuarelas líquidas o anilinas; sobre del fondo seco hemos pintado, también con acuarelas unas manzanas. Hemos dejado secar y hemos empezado a dibujar nuestro doodle con diferentes rotuladores: negros, punta fina, efecto pincel, blancos y metalizados. Nos hemos dejado llevar por la inspiración del momento.
Nos podréis encontrar en FB y si queréis participar con vuestros doodles, ilustraciones, dibujos, mixed media, collages o pinturas, sólo tenéis que poner la etiqueta #domingosilustrados.


¡¡¡MANZANAS DE OTOÑO, DOODLES DE OTOÑO!!!


APPLES OF AUTUMN ON THE #DOMINGOSILUSTRADOS.

At Les Antònies love doodles, therefore, as we had a tinted background and an apple project outlined, we have transformed into a fully-fledged doodle.
As we said above, the background is tinted with liquid watercolors or anilines; on the dry base we have also painted watercolor apples. We have left to dry and we have begun to draw our doodle with different markers: black, fine tip, brush effect, white and metallic. We have let us take by the inspiration of the moment.
You can find us on FB and if you want to participate with your doodles, illustrations, drawings, mixed media, collages or paintings, you have only to put the tag #domingosilustrados.


APPLES OF AUTUMN, DOODLES OF AUTUMN!!!

UN QUART DE CERCLE: TUTORIAL PATCHWORK.

En aquest post, Les Antònies, us volem explicar com ens hem complicat la vida provant de fer un cercle de patchwork. No ens ha quedat tan malament com ens pensàvem, però ho hem fet a partir de quarts de cercle. Amb aquest tutorial us ensenyarem com fer-ho.
Els materials necessaris per fer un bloc són: quatre quadrats amb estampats diferents de 17cmX17cm; no ens cal res més.
Damunt d’un dels quadrats dibuixem un quart de cercle; el radi que nosaltres hem fet és de 14cm (1). Aquesta passa la podeu fer de diverses maneres: dibuixant directament o fent un patró en paper. Una vegada dibuixat, el retalleu (2); separeu i repetiu la mateixa operació amb els quadrats restants (3).
Ara toca jugar a muntar el puzle. Distribuïu com més us agradi; nosaltres ho fet per parelles, però no és obligatori (4). Comencem a muntar els mini blocs: primer, amb agulles, fixem els dos extrems com veieu al dibuix (5); amb més agulles acabem de fixar el quart de cercle (6), feu-ne servir tantes com us calguin. Ja podem cosir (7); o podeu fer a mà o, com nosaltres, a màquina seguint la corba. Obriu i planxeu primer per darrera i després pel davant (8); segurament us quedi algun tram una mica encongit, no passa res, però si veieu que és molt exagerat, desfeu i, a poc a poc, torneu a cosir-lo.
Quan ja tenim els quatre mini blocs, els col·loquem com més ens agradi i cosim els dos de dalt i els dos d’abaix (10) procurant que el quarts de cercle quedin ben ajustats. Amb les dues parts acabades (11) encarem procurant que el cercle quedi el màxim d’ajustat possible i cosim (12).
Bloc acabat (13). Us donem una mostra de com quedarien 4 blocs muntats (14) i les mesures i mostres de les teles.
Esperem que us atreviu amb aquesta aventura. Les que esteu acostumades a cosir mànigues ho tindreu molt més fàcil, perquè és el mateix procediment.


QUATRE QUARTS FAN UN CERCLE!!!


UN CUARTO DE CÍRCULO: TUTORIAL PATCHWORK.

En este post, Les Antònies, os queremos explicar cómo nos hemos complicado la vida probando hacer un círculo de patchwork. No nos ha quedado tan mal como nos pensábamos, pero lo hemos hecho a partir de cuartos de círculo. Con este tutorial os enseñaremos como hacerlo.
Los materiales necesarios para hacer un bloque son: cuatro cuadrados con estampados diferentes de 17cmX17cm; no necesitamos nada más.
Sobre uno de los cuadrados dibujamos un cuarto de círculo; el radio que nosotras hemos hecho es de 14cm (1). Este paso lo podéis hacer de diversas maneras: dibujando directamente o haciendo un patrón en papel. Una vez dibujado, lo recortáis (2); separáis y repetís la misma operación con los cuadrados restantes (3).
Ahora toca jugar a montar el puzle. Distribuid como más os guste; nosotras lo hemos hecho por parejas, pero no es obligatorio (4). Comencemos a montar los mini bloques: primero, con alfileres, fijamos los dos extremos como veis en el dibujo (5); con más alfileres acabamos de fijar el cuarto de círculo (6), usad tantos como necesitéis. Ya podemos coser (7); lo podéis hacer a mano o, como nosotras, a máquina siguiendo la curva. Abrid y planchad primero por detrás y después por delante (8); seguramente os quede algún tramo un poco encogido, no pasa nada, pero si veis que es muy exagerado, deshaced y, despacio, volved a coserlo.
Cuando ya tenemos los cuatro mini bloques, los colocamos como más nos guste y cosemos los dos de arriba y los dos de abajo (10) procurando que los cuartos de círculo queden bien ajustados. Con las dos partes acabadas (11) encaramos procurando que el círculo quede lo máximo de ajustado posible y cosemos (12).
Bloque acabado (13). Os damos una muestra de cómo quedarían 4 bloques montados (14) y las medidas y muestras de las telas.
Esperamos que os atreváis con esta aventura. Las que estáis acostumbradas a coser mangas lo tendréis mucho más fácil, porque es el mismo procedimiento.


¡¡¡CUATRO CUARTOS HACEN UN CÍRCULO!!!


A QUARTER OF A CIRCLE: PATCHWORK TUTORIAL.

In this post, Les Antònies, explain you how we have complicated our life trying to make a circle of patchwork. We would not have been as bad as we thought, but we have done it on the basis of quarter of a circle. With this tutorial we will teach you how to do it.
The materials needed to make a block are: four square patterned different from 17cmX17cm; we don't need anything else.
On one of the squares, we draw a quarter of circle; the radio we've made is 14 cm (1). This step you can do it in various ways: by directly drawing or making a pattern on paper. Once drawn, cut off it (2); you separate it and repeat the same operation with the remaining squares (3).
Now we have to play to assemble the puzzle. Distribute as you like; we do it for couples, but it is not required (4). We started to made the mini blocks: first, with needles, pin at the two extremes as you can see in the drawing (5); with more needles we just fix the quarter of circle (6), then use as many as you need. We can sew (7); you can do it by hand or, like us, to machine along the curve. Open and ironing first to  the reverse and then the front (8); surely you keep a stretch a little shrunken, nothing happens, but if you find it is very exaggerated, undo and, slowly, go back to sewing it.
When we have the four mini blocks, place them as you like and sew the two above and two below (10) ensuring that the quarter of circle are fully tightened. With the two sides finished (11) we face providing that the circle is the adjusted maximum possible and sew (12).
Block finish (13). We give you a sample of how would look 4 mounted blocks (14) and measures and samples of fabrics.
We hope you daring with this adventure. To those that are accustomed to sew sleeves will be much easier, because it is the same procedure.


FOUR QUARTERS MAKE A CIRCLE!!!