BASTIDORS I ESTELS AL REPTE PINTEREST DE NOVEMBRE.

Arribem a final de mes i ens trobem al Repte Pinterest del blog Scarlata y el Señor Don Gato. Aquesta vegada la proposta ha sigut fer servir bastidors per presentar els nostres treballs.
Les Antònies tenim debilitat pel patchwork i, encara que som aprenents, ens hem decidit per presentar-vos un estel aplicat fent servir aquesta disciplina.
Hem utilitzat la mateixa tècnica que vàrem fer servir per fer l’aguller en forma de cor. Hem optat per fer un estel amb un disseny molt característic del patchwork (us deixem el patró) i l’hem aplicat damunt d’una tela de cotó en color cru.
El resultat és acolorit i clàssic alhora. Esperem que us agradi la nostra idea.


UN GIR MODERN A UN DISSENY CLÀSSIC!!!


BASTIDORES Y ESTRELLAS EN EL RETO PINTEREST DE NOVIEMBRE.

Llegamos a final de mes y nos encontramos en el RetoPinterest del blog Scarlata y el Señor Don Gato. Esta vez nos han propuesto usar bastidores para presentar nuestros trabajos.
Les Antònies tenemos debilidad por el patchwork y, aunque somos aprendizas, nos hemos decidido por presentaros una estrella aplicada usando esta disciplina.
Hemos usado la misma técnica que con la que hicimos el alfiletero en forma de corazón. Hemos optado por hacer una estrella con un diseño muy característico del patchwork (os dejamos el patrón) y la hemos aplicado sobre una tela de algodón en color crudo.
El resultado es colorista y clásico a la vez. Esperamos que os guste nuestra idea.


¡¡¡UN GIRO MODERNO A UN DISEÑO CLÁSICO!!!


HOOP FRAMES AND STARS TO NOVEMBER PINTEREST CHALLENGE.

We arrived at the end of the month and we are at the PinterestChallenge’s Scarlata y el Señor Don Gato blog. This time the proposal has been to use hoop frames to present our work.
Les Antònies have a weakness for patchwork and, although we are learners, we have decided to present you a star applied using this discipline.
We have used the same technique that we use to make the heart-shaped pincushion. We have decided to make a star very characteristic of patchwork (we leave the pattern) and we have applied on a cotton fabric in ecru colour.
The result is colourful and classic at the same time. We hope you like our idea.


A MODERN TWIST TO A CLASSIC DESIGN!!!


 photo Subscripcioacutesobres_zps9cf2e0ca.jpg

LA CINQUENA CRAFTY BLOGGERS FRIDAY FINDS.

Les Antònies continuem presentant-vos Crafty Bloggers i, com ja heu comprovat, les temàtiques dels seus blogs i pàgines són molt variades i úniques.
Els vuit Crafty Bloggers d’aquesta setmana són una bona representació d’això que us comentàvem més amunt. Tots són multidisciplinaris i enfoquen els seus treballs d’una manera original i personal.
Els seus interessos van més enllà d’una sola temàtica i experimenten amb totes. En aquesta edició trobareu de tot una mica i la més profunda inspiració dels artistes Crafty Bloggers.

ARTISTES DE CAP A PEUS!!!


LA QUINTA CRAFTY BLOGGERS FRIDAY FINDS.

Les Antònies  os continuamos presentando Crafty Bloggers y, como ya habéis comprobado, las temáticas de sus blogs y paginas son muy variadas y únicas.
L@s ocho Crafty Bloggers de esta semana son una buena representación de lo que os comentábamos más arriba. Tod@s son multidisciplinari@s y enfocan sus trabajos de una manera original y personal.
Sus intereses van más allá de una sola temática y experimentan con todas. En esta edición encontraréis de todo un poco y la más profunda inspiración de l@s artistas Crafty Bloggers.

¡¡¡ARTISTAS DE PÍES A CABEZA!!!


THE FIFTH CRAFTY BLOGGERS FRIDAY FINDS.

Les Antònies continue presenting you the Crafty Bloggers and, as you've already checked, the themes of their blogs and webs are very varied and unique.
The eight Crafty Bloggers this week are a good representation of it that we mentioned above. All are multidisciplinary and focus their work in an original and personal way.
Their interests go beyond a single topic and experience with all of them. In this edition you will find everything and a bit deeper inspiration of the artists Crafty Bloggers.

ARTISTS FROM HEAD TO TOE!!!


 photo Subscripcioacutesobres_zps9cf2e0ca.jpg

TUTORIAL PATCHWORK: TAPET DE NADAL VERSIÓ LES ANTÒNIES.

Aquest tapet o tapis, depèn de l’ús que li donem, és molt senzill de fer i és la nostra particular visió del Nadal. Ja sabeu que no som gaire ortodoxes i, al final, sempre fem un gir i ens desviem del camí, per fer-lo més fàcil o per complicar-nos la vida. En fi, Les Antònies tenim esperit aventurer.
Comencem el tutorial. Necessitem 6 retalls de teles diferents de 20cmX20cm (1). Els disposem de dos en dos i els encarem (2). La novetat d’aquest tutorial és que us ensenyarem a treure 8 quadrats amb triangle de cada parella. Per fer això, dibuixem una creu aspada de cantonada a cantonada. Cosim dues costures per fora de cada línia com veieu al dibuix (3). El truc està en com tallem. Pel centre de la línia que hem dibuixat, deixant una costura a cada banda, i per la meitat del quadre en horitzontal i vertical (4). Obtenim 8 triangles (5) i, oberts, ens queden els 8 quadrats amb triangle. Al final ens han de sortir 3 jocs de 8 quadrats cada un (6).
Distribuïm com veieu a l’esquema: 2 tires laterals i 4 mini-blocs (7). Cosirem i unirem el conjunt com sempre hem fet: de mini-bloc en mini-bloc; les tires laterals; els 4 mini-blocs i, al final, les tires a cada costat.
Per fer el tapet, necessitem: el patchwork, folre de la mateixa mesura que el patchwork i buata una mica més gran per treballar amb comoditat (8).
Comencen muntant el tapet, col·locant damunt de la buata, amb agulles,  el patchwork i encarem el folre damunt del patchwork (9). Per assegurar-vos millor, embasteu el folre i el patchwork i després els col·loqueu a la buata. Cosim al voltat amb una costura, però deixem un tros sense cosir, per poder girar la labor (10). Abans tallem la buata sobrant (11), girem (12), aplanem i cosim l’obertura (13). Ja tenim el tapet acabat (14), només queda decorar-lo. Podeu fer-ho com vulgueu. Nosaltres hem fet repunts en color vermell, per fer contrast, amb diferents punts de la màquina de cosir i hem aplicat quatre llaçades amb una cinta de quadrets vichy en vermell i blanc.
Ja veieu que no és gaire complicat, depèn de la vostra experiència cosint, i creiem, de debò, que el resultat te l’esperit nadalenc d’aquestes dades.


AMB EL TOC VERMELL FEM NADAL!!!


TUTORIAL PATCHWORK: TAPETE DE NAVIDAD VERSIÓN LES ANTÒNIES.

Este tapete o tapiz, depende del uso que le demos, es muy sencillo de hacer y es nuestra particular visión de la Navidad. Ya sabéis que no somos muy ortodoxas y, al final, siempre damos un giro y nos desviamos del camino, para hacerlo más fácil o para complicarnos la vida. En fin, Les Antònies tenemos espíritu aventurero.
Empezamos el tutorial. Necesitamos 6 retales de telas diferentes de 20cmX20cm (1). Los disponemos de dos en dos y los encaramos (2). La novedad de este tutorial es que os enseñaremos a sacar 8 cuadrados con triángulo de cada pareja. Para hacer esto, dibujamos una cruz aspada de esquina a esquina. Cosemos dos costuras por fuera de cada línea como veis en el dibujo (3). El truco está en cómo cortamos. Por el centro de la línea que hemos dibujado, dejando una costura a cada lado, y por la mitad del cuadro en horizontal y vertical (4). Obtenemos 8 triángulos (5) y, abiertos, nos quedan los 8 cuadrados con triángulo. Al final nos tienen que salir 3 juegos de 8 cuadrados cada uno (6).
Distribuimos como veis en el esquema: 2 tiras laterales y 4 mini-bloques (7). Coseremos y uniremos el conjunto como siempre hemos hecho: de mini-bloque en mini-bloque; las tiras laterales; los 4 mini-bloques juntos y, al final, las tiras a cada lado.
Para hacer el tapete, necesitamos: el patchwork, forro de la misma medida que el patchwork y guata algo más grande para trabajar con comodidad (8).
Empezamos montando el tapete, colocando encima de la guata, con alfileres, el patchwork y encaramos el forro encima del patchwork (9). Para aseguraros mejor, hilvanáis el forro y el patchwork y después los colocáis en la guata. Cosemos alrededor con una costura, pero dejamos un trozo sin coser, para poder girar la labor (10). Antes de esto, cortamos la guata sobrante (11), giramos (12), allanamos y cosemos la apertura (13). Ya tenemos el tapete acabado (14), sólo queda decorarlo. Podéis hacerlo cómo queráis. Nosotras hemos hecho pespuntes en color rojo, para hacer contraste, con diferentes puntos de la máquina de coser y hemos aplicado cuatro lazadas con una cinta de cuadritos Vichy en rojo y blanco.
Ya veis que no es muy complicado, depende de vuestra experiencia cosiendo, y creemos, de verdad, que el resultado tiene el espíritu navideño de estas fechas.


¡¡¡CON EL TOQUE ROJO HACEMOS NAVIDAD!!!


PATCHWORK TUTORIAL: CHRISTMAS TABLE RUNNER LES ANTÒNIES  VERSION.

This table runner or tapestry, depends on the use we give, is very simple to make and it’s our own vision of Christmas. You know that we are not very orthodox and, at the end, always give a twist and turn off the road, to make it easier or to complicate life. In the end, Les Antònies have adventurous spirit.
We begin the tutorial. We need 6 different fabric scraps of 20cmX20cm (1). We have them in pairs and face them (2). The novelty of this tutorial is to teach you to have 8 squares with the triangle of each couple. To do this, draw a cross from corner to corner. Sew two seams on the outside of each line as you can see in the drawing (3). The trick is how to cut. Through the centre of the line you have drawn, leaving a seam on each side and by the middle of the square horizontally and vertically (4). Get 8 triangles (5) and open, we are the 8 squares with triangle. At the end we have to leave 3 sets of 8 squares each (6).
Distribute as you can see in the diagram: 2 lateral strips and 4 mini-blocks (7). Sewing and we will attach the set as we have always done: mini-block on mini-block; side strips; the 4 mini-blocks and, in the end, the strips on each side.
To make the table runner, we need: the patchwork, lining of the same as patchwork and quilting padding a little bigger to work with comfort (8).
Start mounting the table runner, placing on top of the quilting padding, with pins, the patchwork and face the liner on top of the patchwork (9). To ensure better, tacking together lining and patchwork and then put in the quilting padding. Sew around with a seam, but leave a piece without sewing, to be able to rotate the work (10). Before this, we cut the excess of quilting padding (11), turn (12), levelling and sew the opening (13). We already have the finished table runner (14), it remains only to decorate it. You can do it as you like. We have made backstitches in red, by contrast, made with different points of the sewing machine and we applied four bows with a Vichy ribbon in red and white.
As you can see that it's not very complicated, it depends on your sewing experience, and we believe, seriously, that the result has the Christmas spirit of these time.


WITH THE RED TOUCH WE DO CHRISTMAS!!!


 photo Subscripcioacutesobres_zps9cf2e0ca.jpg

TUTORIAL SCRAPBOOK: MINI-ÀLBUM CAIXA.

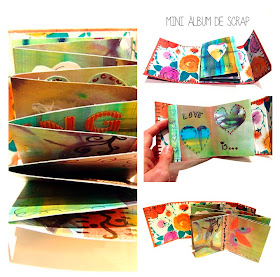
En aquest post, Les Antònies, us volem presentar un mini-àlbum fet amb material reciclat, però que també es pot fer amb material de primera mà.
Per començar, ens hem fet nosaltres mateixes dues fulles de paper scrap: sobre dues cartolines de 35X35cm (12x12”), amb aquarel·la líquida, hem fet els nostres dissenys. Hem pintat per les dues cares i hem fet quatre estampats diferents. A partir d’aquí, hem rebuscat entre tots els nostres materials acumulats i ens hem preparat per fer el mini-àlbum.
Què necessitem? En el tutorial dibuixat ho teniu, però us ho detallem millor: Per la portada usarem un full de 31X14cm (nosaltres teníem un retall de paper d’empaperar); per la contraportada un full de 30’5x10’5cm (un disseny d’estampat antic). Per fer la carcassa de la caixa necessitem cartró i nosaltres hem fet servir el d’una caixa de cereals; hem de fer 5 peces amb les següents mides: 1) 11X6’5cm, 2) 11X3’6cm, 3) 11x8cm, 4) 11x3cm i 5) 11x5cm. Per fer els fulls interiors tenim dues opcions: amb paper d’scrap estampat per les dues cares, els fulls han de ser de 18x10cm; amb paper estampat només per una cara han de ser de 16’5x10cm.
Comencem a muntar el mini-àlbum. Col·loquem damunt del paper de la portada, sobre la cara que no es veurà, els cartrons tallats, en l’ordre que us donem, centrant-los al paper, deixant marge a les vores i, també, un marge de 0’5cm entre ells; els enganxem amb cola blanca (1). Retallem les puntes (2) per poder plegar i enganxar les vores (3). Enganxem la contraportada, centrant-la (4), tapant els cartrons (nosaltres ho hem fet amb cel·lo de doble cara). Marquem bé les separacions i pleguem la caixa (5) i ens ha de quedar així (6).
Ja podem preparar els fulls interiors. Amb l‘opció de paper estampat per les dues cares, deixem una pestanya de 1’5cm al lateral de cada paper (7), pleguem pel mig (8x8cm) i enganxem el següent full a la pestanya (8); així successivament, amb els fulls que vulguem posar. Amb l’opció de paper estampat només per una cara, marquem al mig del full 0’5cm i pleguem, fent un petit llom (9) i enganxem mitja cara blanca d’un full a mitja cara blanca de l’altre (10) fins que tenim tots els fulls que necessitem.
Per últim, enganxem els fulls a la caixa, centrant-los a la part més ampla (11), comprovem que ens queda tot ben ajustat, tanquem (nosaltres ho hem fet amb un cordill rematat amb dues boles de fusta) i només ens queda decorar com vulguem.
Si us agrada el resultat, no dubteu a fer-ne una. És petita, manejable i pot ser un bon regal de Nadal.


UN MINI-ÀLBUM PER GUARDAR GRANS RECORDS!!!


TUTORIAL SCRAPBOOK: MINI-ÁLBUM CAJA.

En este post, Les Antònies, os queremos presentar un mini-álbum hecho con material reciclado, pero que también se puede hacer con material de primera mano. 
Para empezar, nos hemos hecho nosotras mismas dos hojas de papel scrap: sobre dos cartulinas de 35X35cm (12x12”), con acuarela líquida, hemos hecho nuestros diseños. Hemos pintado por las dos caras y hemos hecho cuatro estampados diferentes. A partir de aquí, hemos rebuscado entre todos nuestros materiales acumulados y nos hemos preparado para hacer el mini-álbum.
¿Qué necesitamos? En el tutorial dibujado lo tenéis, pero os lo detallamos mejor: Para la portada usaremos una hoja de 31X14cm (nosotras teníamos un recorte de papel de empapelar); para la contraportada una hoja de 30’5x10’5cm (un diseño de estampado antiguo). Para hacer la carcasa de la caja necesitamos cartón y nosotros hemos usado el de una caja de cereales; tenemos que hacer 5 piezas con las siguientes medidas: 1) 11X6’5cm, 2) 11X3’6cm, 3) 11x8cm, 4) 11x3cm y 5) 11x5cm. Para hacer las páginas interiores tenemos dos opciones: con papel de scrap estampado por las dos caras, las hojas tienen que ser de 18x10cm; con papel estampado sólo por una cara tienen que ser de 16’5x10cm.
Empezamos a montar el mini-álbum. Colocamos encima del papel de la portada, sobre la cara que no se verá, los cartones cortados, en el orden que os damos, centrándolos al papel, dejando margen en los bordes y, también, un margen de 0’5cm entre ellos; los enganchamos con cola blanca (1). Recortamos las puntas (2) para poder plegar y pegar los bordes (3). Pegamos la contraportada, centrándola (4), tapando los cartones (nosotros lo hemos hecho con celo de doble cara). Marcamos bien las separaciones y plegamos la caja (5) y nos tiene que quedar así (6).
Ya podemos preparar las páginas interiores. Con la opción de papel estampado por las dos caras, dejamos una pestaña de 1’5cm en el lateral de cada papel (7), plegamos por el medio (8x8cm) y pegamos la siguiente hoja a la pestaña (8); así sucesivamente, con las páginas que queramos poner. Con la opción de papel estampado sólo por una cara, marcamos en medio de la hoja 0’5cm y plegamos, haciendo un pequeño lomo (9) y pegamos media cara blanca de una página a media cara blanca de la otra (10) hasta que tenemos todas las hojas que necesitamos.
Por último, enganchamos las página a la caja, centrándolas en la parte más ancha (11), comprobamos que nos queda todo muy ajustado, cerramos (nosotras lo hemos hecho con un cordel rematado con dos bolas de madera) y sólo nos queda decorar como queramos.
Si os gusta el resultado, no dudéis a hacer una. Es pequeña, manejable y puede ser un buen regalo de Navidad.


¡¡¡UNO MINI-ÁLBUM PARA GUARDAR GRANDES RECUERDOS!!!


SCRAPBOOK TUTORIAL: MINI-ALBUM BOX.

In this post, The Antònies, we present a mini-album made with recycled material, but can also be done with first-hand material.
To start, we have made ourselves two scrap sheets of paper: on two cardboards of 35X35cm (12x12 "), with liquid aquarelle, we've done our designs. We have painted on both sides and we have made four different prints. From here, we have searching in all of our accumulated materials and we are ready to make the mini-album.
What do we need? In the tutorial you have drawn it, but you can find better: For the cover use a 31X14cm (we had a sheet of wallpaper); for the back cover a sheet of 30 ' 5x10 ' 5 cm (an old print design). To make the case of the box we need cardboard and we used a box of cereals; we have to make 5 pieces with the following sizes: 1) 11X6'5 cm, 2) 11X3'6 cm, 3) 11x8cm, 4) 11x3cm and 5) 11x5cm. To make the interior sheets we have two options: with scrap paper printed on both sides, the pages must be 18x10cm; with paper printed only on one side must be 16 ' 5x10cm.
We start to do the mini-album. Place on the role of the cover, on the side that will not be seen, the cardboard cut, in the order that we give, focusing them on the paper, leaving a margin around the edges and, also, a margin of 0’5 cm between them; glued with white glue (1). Cut the tips (2) to be able to fold and glue the edges (3). Attach the back cover, focussing the (4), covering cartons (we've done with double-sided tape). Mark well the separations and folded the box (5) and it should be like this (6).
Now, we can prepare the interior sheets. With the option of paper printed on both sides, leaving a tab 1'5 cm on the side of each paper (7), let's fold it the middle (8x8cm) and attach the following fact sheet on the tab (8); so, with the sheets that you want to set. With the option of paper printed on one side only, mark in the middle of the 0'5 cm and let's fold it, making a small loin (9) and attach half-white face of a sheet in half-white face of the other (10) until we have all that we need.
Finally, attach the sheets in the box, focusing them on the widest part (11), we check that we have all well-adjusted, close (we've done with a cord, topped with two wooden balls) and we only have to decorate as we want.
If you like the results, do not hesitate to make them. It is small, handy and can be a good Christmas gift.


A MINI-ALBUM TO SAVE GREAT MEMORIES!!!


 photo Subscripcioacutesobres_zps9cf2e0ca.jpg

CRAFTY BLOGGERS SUNDAY DOODLE PARTY 12+1.

Les Antònies desitgem que cap de vosaltres sigui supersticiós, perquè aquesta edició és la del número maleït. De tota manera nosaltres celebrem estar aquí fent allò que més ens agrada: doodles.
El tema d’aquesta setmana, Gats, ens ha inspirat per fer un doodle molt sobri i elegant, com són aquests animalons tan “craftys”.
Sobre una cartolina grisa hem dibuixat una sanefa amb ceres i al damunt hem aplicat les siluetes de dos gatets fetes amb doodles, dibuixats amb retolador negre . També hem aplicat un cor i una piloteta fets, igualment, amb doodles.
En els enllaços de sota podreu trobar les mascotes dels nostres Crafty Bloggers, fetes amb tot l’amor i inspiració, especialment dedicats a vosaltres.
La setmana vinent no tindrem Sunday Doodle Party, perquè tenim una cita amb el Repte Pinterest d’Scarlata y el Señor Don Gato, però el diumenge 7 de desembre tornarem amb el tema: LLUNA.
Gaudiu amb nosaltres i els nostres gats.

EL DIUMENGE 7 TORNEM AMB LA 14ª!!!


CRAFTY BLOGGERS SUNDAY DOODLE PARTY 12+1.

Les Antònies deseamos que ningun@ de vosotr@s sea supersticios@, porque esta edición es la del número maldito. De todas maneras nosotras celebramos estar aquí haciendo aquello que más nos gusta: doodles.
El tema de esta semana, Gatos, nos ha inspirado para hacer un doodle muy sobrio y elegante, como son estos animalitos tan “craftys”.
Sobre una cartulina gris hemos dibujado una cenefa con ceras y encima hemos aplicado las siluetas de dos gatitos hechas con doodles, dibujados con rotulador negro . También hemos aplicado un corazón y una pelotita hechos, igualmente, con doodles.
En los enlaces de debajo podréis encontrar las mascotas de nuestr@s Crafty Bloggers, hechos con todo el amor e inspiración, especialmente dedicados a vosotr@s.
La próxima semana no tendremos Sunday Doodle Party, porque tenemos una cita con el Reto Pinterest de Scarlata y el Señor Don Gato, pero el domingo 7 de diciembre volveremos con el tema: LUNA.
Disfrutad con nosotr@s y nuestros gatos.

¡¡¡EL DOMINGO 7 VOLVEMOS CON LA 14ª!!!


CRAFTY BLOGGERS SUNDAY DOODLE PARTY 12 + 1.

Les Antònies hope that none of you are superstitious, because this edition is the dam it number. Anyway we welcome to be here doing what we love: doodles.
This week's theme, Cats, has inspired us to do a doodle very sober and elegant, as these animals are so "craftys".
On a gray cardboard we have drawn a border with colour waxes and above we have applied the silhouettes of two kittens made with doodles, drawn with black marker . We have also applied a heart and a ball made, also with doodles.
In the links below you can find the pets of our Crafty Bloggers, made with all the love and inspiration, especially dedicated to you.
Next week we will not have Sunday Doodle Party, because we have an appointment with the Pinterest challenge of Scarlata y el Señor Don Gato, but on Sunday, December 7 we will return with the theme: MOON.
Enjoy with us and our cats.


ON SUNDAY 7 WE RETURN WITH THE 14th!!!


 photo Subscripcioacutesobres_zps9cf2e0ca.jpg

CRAFTY BLOGGERS FRIDAY FINDS Nº 4.

Quart lliurament i nova tongada de Crafty Bloggers.
Les Antònies estem molt contentes de la rebuda d’aquesta iniciativa i molt satisfetes de l’ interès que teniu per conèixer a la resta de Crafty Bloggers. També us volem dir que tots apareixereu, però que només podem posar vuit cada vegada.
Com sempre, podreu comprovar com de variades són les habilitats dels nostres Crafty Bloggers. Els escollits aquesta setmana són una bona mostra d’això. Scrapbook, ganxet, punt, il·lustració, DIY... tot ho toquen i tot ho comparteixen.
Gaudiu, conegueu, compartiu i comenteu el seu treball amb tots els vostres seguidors i amics.

EN PETITES DOSIS ENS ENGANXEN AL SEU ART!!!


CRAFTY BLOGGERS FRIDAY FINDS Nº 4.

Cuarta entrega y nueva tanda de Crafty Bloggers.
Les Antònies estamos muy contentas del recibimiento de esta iniciativa y muy satisfechas del interés que tenéis por conocer al resto de Crafty Bloggers. También os queremos decir que tod@s apareceréis, pero que sólo podemos poner ocho cada vez.
Como siempre, podréis comprobar como de variadas son las habilidades de nuestr@s Crafty Bloggers. L@s escogid@s esta semana son una buena muestra de esto. Scrapbook, ganchillo, punto, ilustración, DIY... todo lo tocan y todo lo comparten.
Disfrutad, conoced, compartid y comentad su trabajo con todos vuestros seguidores y amigos.

¡¡¡EN PEQUEÑAS DOSIS NOS ENGANCHAN A SU ARTE!!!


CRAFTY BLOGGERS FRIDAY FINDS nº 4.

The Friday Finds fourth edition and a new batch of Crafty Bloggers.
Les Antònies are very happy for the received of this initiative and very satisfied of the interest that you have to get to know the rest of Crafty Bloggers. Also we want to say that all you'll be added, but we can only put eight each time.
As always, you can see how varied the skills of our Crafty Bloggers are. Those elected this week are a good example of this. Scrapbook, crochet, knit, illustration, DIY ... they touch on all and share you all.
Enjoy, learn, share and discuss their work with all your followers and friends.


IN SMALL DOSES WE STICK TO THEIR ART!!!


 photo Subscripcioacutesobres_zps9cf2e0ca.jpg

TUTORIAL NINOT DE PATCHWORK: “CRAFTY MONSTER”.

Deixem una mica de banda els blocs de patchwork per donar-vos idees fàcils i ràpides de realitzar per començar a preparar els regals de Nadal.
Les Antònies, amb aquest ninot, ens hem volgut crear una mascota moderna, una mica Frankenstein, totalment “Crafty”. Ja veieu que és molt simple i gens sofisticada, però molt simpàtica; apta per qualsevol edat, es pot convertir en un coixí pels més minis de la casa.
Ara us farem un petit tutorial de com l’hem fet; també us deixem el patró amb les mesures reals, per descarregar-vos-el.
Nosaltres hem treballat amb 4 teles diferents: pel cap, pel cos, per les cames i pels braços. Tallarem, amb la roba plegada, dues vegades el cap i el cos; recordeu de deixar 0,5 cm de marge per fer les costures. Dels braços i les cames heu de fer 4 peces de cada, deixant, també, un marge de 0,5 cm tot al voltant per les costures.
Comencem unint el cap i el cos; ens han de quedar dues peces: una pel davant i una altra pel darrere. Abans d’unir aquestes dues peces, guarnim el ninot. Nosaltres hem aplicat un mini-bloc, que ens havia quedat d’un altre treball, al cos i un cercle, en una altra tela, per fer la base d’un ull, al cap. La boca, el nas i els ulls els hem pintat amb retolador per estampar tela. Hem fet costures ornamentals amb la màquina de cosir, al davant i al darrere, i hem cosit les peces per fer els braços i les cames; la base l’hem deixat sense cosir per poder girar bé les peces. Ja tenim tot i podem començar a muntar nostre “Crafty Monster”.
Com si fossin les nanses d’una bossa, col·loquem els braços i les cames (en el patró veureu que hem fet unes marques per situar aquestes peces) damunt la part davantera del cos; encarem la part del darrere, deixant els braços i les cames dintre, i cosim, tot al voltant; deixem una obertura en una de les cantonades inferiors, per poder girar el ninot del dret i poder farcir-lo. Quan ja tenim el ninot farcit amb la buata de l’interior d’un coixí, cosim l’obertura i ja podem donar-lo per acabat.
Potser no és el més maco dels ninots, però és el nostre “Crafty Monster” i esperem que també l’adopteu com a mascota.


UN COSÍ LLUNYÀ D’EN BOB ESPONJA!!!


TUTORIAL MUÑECO DE PATCHWORK: “CRAFTY MONSTER”.

Dejamos un poco de lado los bloques de patchwork para daros ideas fáciles y rápidas de realizar para empezar a preparar los regalos de Navidad.
Les Antònies, con este muñeco, hemos querido crear una mascota moderna, un poco Frankenstein, totalmente “Crafty”. Ya veis que es muy simple y nada sofisticada, pero muy simpática; apta para cualquier edad, se puede convertir en un cojín para los más minis de la casa.
Ahora os daremos un pequeño tutorial de cómo lo hemos hecho; también os dejamos el patrón con las medidas reales, para descargároslo.
Nosotras hemos trabajado con 4 telas diferentes: para la cabeza, para el cuerpo, para las piernas y para los brazos. Cortaremos, con la ropa doblada, dos veces la cabeza y el cuerpo; recordad de dejar 0,5 cm de margen para hacer las costuras. De los brazos y las piernas tenéis que hacer 4 piezas de cada, dejando, también, un margen de 0,5 cm todo alrededor para las costuras.
Empezamos uniendo la cabeza y el cuerpo; nos tienen que quedar dos piezas: una por delante y otra por detrás. Antes de unir estas dos piezas, decoramos el muñeco. Nosotros hemos aplicado un mini-bloque, que nos había quedado de otro trabajo, al cuerpo y un círculo, en otra tela, para hacer la base de un ojo, a la cabeza. La boca, la nariz y los ojos los hemos pintado con rotulador para estampar tela. Hemos hecho costuras ornamentales con la máquina de coser, delante y detrás, y hemos cosido las piezas para hacer los brazos y las piernas; la base lo hemos dejado sin coser para poder girar bien las piezas. Ya tenemos todo y podemos empezar a montar nuestro “Crafty Monster”.
Como si fueran las asas de una bolsa, colocamos los brazos y las piernas (en el patrón veréis que hemos hecho unas marcas para situar estas piezas) sobre la parte delantera del cuerpo; encaramos la parte trasera, dejando los brazos y las piernas dentro, y cosemos, todo alrededor; dejamos una apertura en una de las esquinas inferiores, para poder girar el muñeco del derecho y poder rellenarlo. Cuando ya tenemos el muñeco rellenado con la guata del interior de un cojín, cosemos la apertura y ya podemos darlo por acabado.
Quizás no es el más bonito de los muñecos, pero es nuestro “Crafty Monster” y esperamos que también lo adoptéis como mascota.


¡¡¡UN PRIMO LEJANO DE BOB ESPONJA!!!


PATCHWORK DOLL TUTORIAL: "CRAFTY MONSTER".

We let a side the patchwork blocks to give you quick and easy ideas to begin to prepare Christmas gifts.
Les Antònies, with this doll, wanted to create a modern pet, a little Frankenstein, totally "Crafty". As you can see it's very simple and not at all sophisticated, but very friendly; suitable for any age, can become a pillow for the minis of the home.
Now we are going to do a little tutorial of how we have done; now also the pattern with actual measurements, we leave for you download it.
We have worked with 4 different fabrics: the head, the body, the legs and arms. Cut, with the folded clothes, twice the head and body; remember to leave 0, 5 cm margin to make the seams. Of arms and legs you have to make 4 pieces of each, leaving, too, a margin of 0.5 cm all around the seams.
We begin by binding the head and body; we must keep two pieces: one in front and another behind. Before you binding these two pieces, we decorated the doll. We have applied a mini-block, which we had been of another work, to the body and a circle in another fabric, to make the core of an eye, in the head. The mouth, nose and eyes are painted with marker for printing cloth. We made ornamental seams with sewing machine, at the front and at the back, and we have sewn the pieces to make the arms and legs; the base has been left without sewing in order to turn the pieces. We already have everything and we can begin to mount our "Crafty Monster".
As if they were the handles to a bag, place the arms and legs (in the pattern you'll see that we've done a few brands to place these pieces) on the front of the body; time to face the rear, leaving the arms and legs inside, and sew, all around; leave an opening in one of the lower corners, in order to turn the doll and be able to stuff it. When we already have the doll stuffed with the padding of the inside of a pillow, sew the opening and we can give it to finish.
Maybe it's not the most handsome of the dolls, but it is our “Crafty Monster” and hopefully also adopt as a pet.


A DISTANT COUSIN OF SPONGEBOB!!!


 photo Subscripcioacutesobres_zps9cf2e0ca.jpg

FUNDA PER MÒBIL DE FELTRE.

Com que ja estem molt a prop de les festes de Nadal i, com sempre, se’ns cauran a sobre tots els compromisos, us volem donar una idea fàcil i ràpida.
Com ja us hem comentat alguna vegada, Les Antònies trobem que el feltre és un molt bon material per treballar. Per aquest motiu ens hem decidit a fer una funda per mòbil amb ell. Com us hem dit abans és molt ràpid i fàcil de fer.
No us donem mides, perquè només cal tenir el telèfon a mà. Agafem el mòbil i el posem damunt d’una tira de feltre; ha de ser una mica més ampla que el mòbil, podeu deixar mig centímetre per banda. Seguidament plegueu la tira per damunt del mòbil fins a la vora, com si el tapéssiu al llitet i marqueu amb un llapis el final; aquesta seria la tapa del davant, però tingueu en compte que no farem costura sota. Per fer la part del darrere, deixarem un tros més per fer la pestanya de tanca. Amb això ja teniu la funda.
Ara toca guarnir abans de cosir les costures. Podeu posar el que vulgueu, fins i tot, podeu deixar-la llisa. Nosaltres hem fet dos rombes de diferent mesura i una tira per ficar la pestanya de tanca. Quan ho teniu cosit, tocar cosir les costures i ja està la funda feta.
En menys d’una hora teniu un regal ben bonic i, siguem sincers, barat.

MÒBILS BEN ABRIGADETS!!!


FUNDA PARA MÓVIL DE FIELTRO.

Cómo que ya estamos muy cerca de las fiestas de Navidad y, como siempre, se nos caerán encima todos los compromisos, os queremos dar una idea fácil y rápida.
Cómo ya os hemos comentado alguna vez, Les Antònies encontramos que el fieltro es muy buen material para trabajar. Por este motivo nos hemos decidido a hacer una funda para móvil con él. Cómo os hemos dicho antes es muy rápido y fácil de hacer.
No os damos medidas, porque sólo hay que tener el teléfono a mano. Cogemos el móvil y lo ponemos encima de una tira de fieltro; tiene que ser algo más ancha que el móvil, podéis dejar medio centímetro por lado. Seguidamente dobláis la tira por encima del móvil hasta el borde, como si lo taparais en la camita y marcáis con un lápiz el final; esta sería la tapa del delante, pero tened en cuenta que no haremos costura debajo. Para hacer la parte trasera, dejaremos un trozo más para hacer la pestaña de cierre. Con esto ya tenéis la funda.
Ahora toca adornar antes de coser las costuras. Podéis poner lo que queráis, incluso, podéis dejarla lisa. Nosotr@s hemos hecho dos rombos de diferente medida y una tira para meter la pestaña de cierre. Cuando lo hayáis cosido, toca coser las costuras y ya está la funda hecha. 
En menos de una hora tenéis un regalo muy bonito y, seamos sinceros, barato.

¡¡¡MÓVILES BIEN ABRIGADITOS!!!


FELT MOBILE CASE.

Since we are already very close to the Christmas holidays and, as always, we will fall to about all commitments; we want to give you a quick and easy idea.
As we have discussed ever, Les Antònies find that the felt is a very good material to work with. For this reason we have decided to make a case for mobile phone with it. As we have said before is very fast and easy to do.
We do not give sizes, because you only need to have the phone in hand. Take your mobile and put on a strip of felt; it should be a little wider than the mobile, you can leave a half inch or a 0,50cm on each side. Then folded the strip above the cell phone up to the edge, as if cover it in the bed and mark with a pencil on the end; this would be the front cover, but keep in mind that not do couture below. To the rear, leave a bit more to make the close tab. With that already have the case.
Now we have to decorate before you sew the seams. You can put what you want; you can even leave it smooth. We've done two diamonds of different measures and a strip to get the close tab. When you have sewn this, you must sew the seams and is already the case made.
In less than an hour you have a nice gift and, let's face it, cheap.


WELL COZIE MOBILE!!!


 photo Subscripcioacutesobres_zps9cf2e0ca.jpg

IKEBANA A LA CRAFTY BLOGGERS SUNDAY DOODLE PARTY.

Amb aquesta fem la dotzena. Ja portem 12 edicions i estem molt contentes de poder compartir amb vosaltres els nostres dibuixos.
Aquest diumenge el tema és l’ Ikebana, o l’art floral japonès. Nosaltres hem fet flors, fulles i branques; sí és japonès o no, ho jutjareu vosaltres.
El dibuix l’hem treballat amb aquarel·la líquida i retolador negre per fer els doodles. El fons l’hem deixat blanc per donar llum a tot el conjunt.
Com cada diumenge, us deixem els enllaços dels/les artistes Crafty Bloggers, per què pugueu gaudir de la seva inspiració.
La proposta de la setmana vinent és: GATS, les mascotes craftys per excel·lència.

UN AIRE JAPONÈS PER ACABAR LA SETMANA!!!


IKEBANA A LA CRAFTY BLOGGERS SUNDAY DOODLE PARTY.

Con esta hacemos la docena. Ya llevamos 12 ediciones y estamos muy contentas de poder compartir con vosotr@s nuestros dibujos.
Este domingo el tema es el Ikebana, o el arte floral japonés. Nosotras hemos hecho flores, hojas y ramas; sí es japonés o no, lo juzgaréis vosotr@s.
El dibujo lo hemos trabajado con acuarela líquida y rotulador negro para hacer los doodles. El fondo lo hemos dejado blanco para dar luz a todo el conjunto.
Como cada domingo, os dejamos los enlaces de los/las artistas Crafty Bloggers, para qué podáis disfrutar de su inspiración.
La propuesta de la semana próxima es: GATOS, las mascotas craftys por excelencia.

¡¡¡UN AIRE JAPONÉS PARA ACABAR LA SEMANA!!!


IKEBANA IN THE CRAFTY BLOGGERS SUNDAY DOODLE PARTY.

With this we do the dozen. Now we have 12 editions and we are very happy to be able to share with you our drawings.
This sunday, the subject is the Ikebana, or Japanese floral art. We've made flowers, leaves and branches; if it is Japanese or not, you must judge it.
We have worked the drawing with liquid watercolour and black marker to make the doodles. We have made the background white to give light to the whole.
As every Sunday, we leave the links of the Crafty Bloggers artists, what you can enjoy their inspiration.
The proposal for next week is: CATS, crafty pets par excellence.


A JAPANESE AIR TO FINISH THE WEEK!!!


 photo Subscripcioacutesobres_zps9cf2e0ca.jpg